前端学习之路


  • 首页

  • 归档

  • 分类

  • 标签

  • 搜索
close
小朱

小朱

前端学习之路

168 日志
37 分类
37 标签
RSS
GitHub
友情链接
  • 极客学院
  • caniuse
  • codepen
  • JS Bin
  • Babel在线编译
  • Iconfinder图标
  • 在线JSON格式化
  • 智能图像压缩

小程序 canvas 使用

发表于 2018-08-25   |   分类于 WeChat

我们的小程序中有一个功能,会根据用户信息生成图片,并可以保存到相册。第一次是使用前端发起请求,后端生成图片上传到阿里云后给前端返回图片地址,但是上线后发现图片出来的很慢,平均要6~7秒。第二次是使用小程序的 canvas api 在前端绘制图片,可达到平局在3秒左右,但这个过程也遇到了一些问题,描述如下。

多屏幕适配问题

设计稿是基于 375 * 667 尺寸的,如果是用 image 显示图片,我们可以通过计算或使用适配的单位来进行多屏适配。但是 canvas 中不能使用适配的单位,但是可以获取到屏幕的宽度,自己计算每一个尺寸应该有多大,比较麻烦。更好的做法是在绘制前使用 canvasContext.scale api 进行缩放,后面直接使用设计稿中固定的尺寸绘制即可。

绘制圆形用户微信头像

canvas 中绘制图片时,需要先使用 wx.downloadFile api 下载文件到本地,再使用返回的临时路径绘制图片。注意下载的图片的域名需要添加在 downloadFile 合法域名中,否则 iOS 不显示图片。之后使用 canvasContext.clip api 将图片切成圆形。

居中显示不同样式的文字

图片的中间需要显示“第 xxx 天”,整行文字需要居中显示,但数字的字体比较大,因此无法直接使用 canvasContext.setTextAlign api 进行文字居中设置。可使用 canvasContext.measureText
api 先计算出数字显示需要的宽度,然后将 “第 ” 和 “ 天” 放在计算后的位置居右和距左对齐。

Modal 形式的图片被 canvas 覆盖

canvas 属于原生组件,层级是最高的,页面中如果有需要弹出 Modal 的地方,是无法显示在 canvas 上面的。经试验,如果使用两个 canvas,是可以达到一个 canvas 在另一个 canvas 上面的,但是因为我们的项目中弹出的 Modal 有一个按钮,因此无法使用这种方式。我们采用了在屏幕的外面绘制图片,绝对定位,top 为负值,然后下载到本地,用 image 标签引用本地路径来显示图片。

完整示例代码

1
2
3
4
5
6
7
8
9
10
11
12
13
14
15
16
17
18
19
20
21
22
23
24
25
26
27
28
29
30
31
32
33
34
35
36
37
38
39
40
41
42
43
44
45
46
47
48
49
50
51
52
53
54
55
56
57
58
59
60
61
62
63
64
65
66
67
68
69
70
71
72
73
74
75
76
77
78
79
80
81
82
83
84
85
86
87
88
89
90
91
92
93
94
95
96
97
98
99
100
101
102
103
104
105
106
107
108
109
110
111
112
113
114
115
116
117
118
119
120
121
122
123
124
125
126
127
128
129
130
131
132
133
134
135
136
137
138
139
140
141
142
143
144
145
146
// 图片宽度为 330,该值为图片水平居中的位置
const midpoint = 330 / 2;
Page({
...
onLoad(this: PageData, options: Options) {
const canvasContext = wx.createCanvasContext('clockImage');
this.canvasContext = canvasContext;
// 多屏幕适配问题
canvasContext.scale(
app.globalData.windowWidth / 375,
);
canvasContext.drawImage(`../../images/clock_bg.png`, 0, 0, 330, 400);
canvasContext.setTextAlign('center');
canvasContext.setFillStyle('white');
canvasContext.setFontSize(16);
canvasContext.fillText(`我在这里学习`, midpoint, 124);
canvasContext.fillText(`坚持学习《占位占位占位占位》`, midpoint, 150);
canvasContext.setFillStyle('rgba(255, 255, 255, 0.15)');
canvasContext.fillRect(15, 258, 300, 50);
canvasContext.setFillStyle('#8FADFF');
canvasContext.setFontSize(14);
canvasContext.setTextAlign('left');
canvasContext.setFillStyle('#fff');
canvasContext.fillText('The truth is that there is the pinnacle of', 22, 278);
canvasContext.fillText('justice in practice is to use the truth.', 22, 298);
canvasContext.setTextAlign('center');
canvasContext.draw();
// 用户头像
this.drawAvatar(wxInfo);
// 二维码
this.drawQrcode();
// 天数
this.drawDays();
},
drawAvatar(this: PageData, wxInfo: WxInfo) {
const canvasContext = this.canvasContext;
wx.downloadFile({
url: 'path to avatar',
success: res => {
// 绘制圆形用户微信头像
canvasContext.beginPath();
canvasContext.arc(midpoint, 40, 24, 0, 2 * Math.PI);
canvasContext.clip();
canvasContext.drawImage(res.tempFilePath, midpoint - 24, 16, 48, 48);
canvasContext.setFontSize(12);
canvasContext.draw(true, () => {
this.setData(
{
showAvatar: true,
canSave: this.data.showDays && this.data.showQrcode,
},
() => {
this.saveTempImage();
},
);
});
},
fail: () => {
this.drawAvatar();
},
});
},
drawQrcode(this: PageData) {
const canvasContext = this.canvasContext;
wx.downloadFile({
url: 'https://res.wx.qq.com/mpres/htmledition/images/mp_qrcode3a7b38.gif',
success: res => {
canvasContext.drawImage(res.tempFilePath, 68, 328, 56, 56);
canvasContext.draw(true, () => {
this.setData(
{
showQrcode: true,
canSave: this.data.showAvatar && this.data.showDays,
},
() => {
this.saveTempImage();
},
);
});
},
fail: () => {
this.drawQrcode();
},
});
},
drawDays(this: PageData) {
const canvasContext = this.canvasContext;
// 居中显示不同样式的文字
canvasContext.setFontSize(48);
const days = '99';
const dayWidth = canvasContext.measureText(days).width / 2;
canvasContext.setFillStyle('#8FADFF');
canvasContext.setFontSize(16);
canvasContext.setTextAlign('right');
canvasContext.fillText('第 ', midpoint - dayWidth, 210);
canvasContext.setFillStyle('#FF9F65');
canvasContext.setFontSize(48);
canvasContext.setTextAlign('center');
canvasContext.fillText(days, midpoint, 210);
canvasContext.setFillStyle('#8FADFF');
canvasContext.setFontSize(16);
canvasContext.setTextAlign('left');
canvasContext.fillText(' 天', midpoint + dayWidth, 210);
canvasContext.draw(true, () => {
this.setData(
{
showDays: true,
canSave: this.data.showAvatar && this.data.showQrcode,
},
() => {
this.saveTempImage();
},
);
});
},
saveTempImage(this: PageData) {
// 下载图片
if (this.data.canSave && !this.data.saving) {
this.setData({
saving: true,
});
wx.canvasToTempFilePath({
canvasId: 'clockImage',
success: res => {
// image 组件的 src 值为 clockImagePath
this.setData({
clockImagePath: res.tempFilePath,
});
this.setData({
saving: false,
});
},
fail: () => {
this.setData({
saving: false,
});
},
});
}
},
});

小程序下载文件

发表于 2018-08-25   |   分类于 WeChat

需求为点击文件列表,可预览文件,可下载文件或以其它方式能在桌面端看文件。首先需要在小程序后台配置业务域名。经探索,需要使用 wx.downloadFile 先下载文件,再使用 wx.saveFile 将下载的临时文件保存到本地,再使用 wx.openDocument 打开保存后的文件。

在 android 手机(华为荣耀8)上,文件下载或保存后,是保存在 本地/内部存储/Tecent/MicroMsg/wxafiles/此处为appId 目录中,下载的文件为临时文件,文件以 temp 开头,保存的文件以 store 开头。很奇怪,使用远程调试时输出的路径都是带有后缀的路径,但在文件系统中打开文件查看详情都是没有后缀的,如图1、图2所示。

在小程序中使用 wx.openDocument 打开文件后,在 android 上点击右上角三个点发送到微信传输助手在桌面端打开时都显示为 exec 文件,没办法直接打开,如图3、图4所示,重命名添加后缀后是可以的。

示例代码如下:

1
2
3
4
5
6
7
8
9
10
11
12
13
14
15
16
17
18
19
20
21
22
23
24
25
26
27
28
29
30
31
Page({
downloadFile() {
// 下载文件
wx.downloadFile({
url: 'http://example.com/somefile.pdf',
success: function(res) {
const tempFilePath = res.tempFilePath;
// 保存文件
wx.saveFile({
tempFilePath,
success: function (res) {
const savedFilePath = res.savedFilePath;
// 打开文件
wx.openDocument({
filePath: savedFilePath,
success: function (res) {
console.log('打开文档成功')
},
});
},
fail: function (err) {
console.log('保存失败:', err)
}
});
},
fail: function(err) {
console.log('下载失败:', err);
},
});
},
});

小程序多媒体相关

发表于 2018-08-25   |   分类于 WeChat

音频(待优化)

音频播放是自己封装了 Component,传入参数进行展示,如是否播放中、当前播放进度、总时长,主要是样式的封装,在播放音频的地方调用背景音频播放管理 api 进行播放,在各种回调的方法中更新参数。需要注意的是 title 参数必须设置,否则 ios 会报错。

1
2
3
4
5
6
7
8
9
10
11
12
13
14
15
16
17
18
19
20
21
22
23
Page({
onLoad() {
this.backgroundAudioManager = wx.getBackgroundAudioManager();
this.backgroundAudioManager.onPlay(() => {...});
this.backgroundAudioManager.onPause(() => {...});
this.backgroundAudioManager.onEnded(() => {...});
this.backgroundAudioManager.onStop(() => {...});
this.backgroundAudioManager.onTimeUpdate(() => {...});
},
handleVoicePlay(this: PageData, e: PageCustomEvent) {
// title 必须设置,否则 ios 会报错
this.backgroundAudioManager.title = '标题';
this.backgroundAudioManager.coverImgUrl = '图片 url';
this.backgroundAudioManager.src = e.target.dataset.src;
this.backgroundAudioManager.startTime = 0;
},
handleVoicePause(this: PageData) {
this.backgroundAudioManager.stop();
},
handleVoiceSeek(this: PageData, e: PageCustomEvent) {
this.backgroundAudioManager.seek(e.detail.value);
},
})

视频

视频播放如无特殊要求,使用官方提供的 video 组件即可。但是注意“请勿在 scroll-view、swiper、picker-view、movable-view 中使用 video 组件”,这些情况下样式会有较严重的问题。也可以在这些情况下使用一张预览图占位显示视频,点击后跳转到一个新页面使用 video 播放视频。

小程序 Swiper 使用

发表于 2018-08-25   |   分类于 WeChat

Swiper

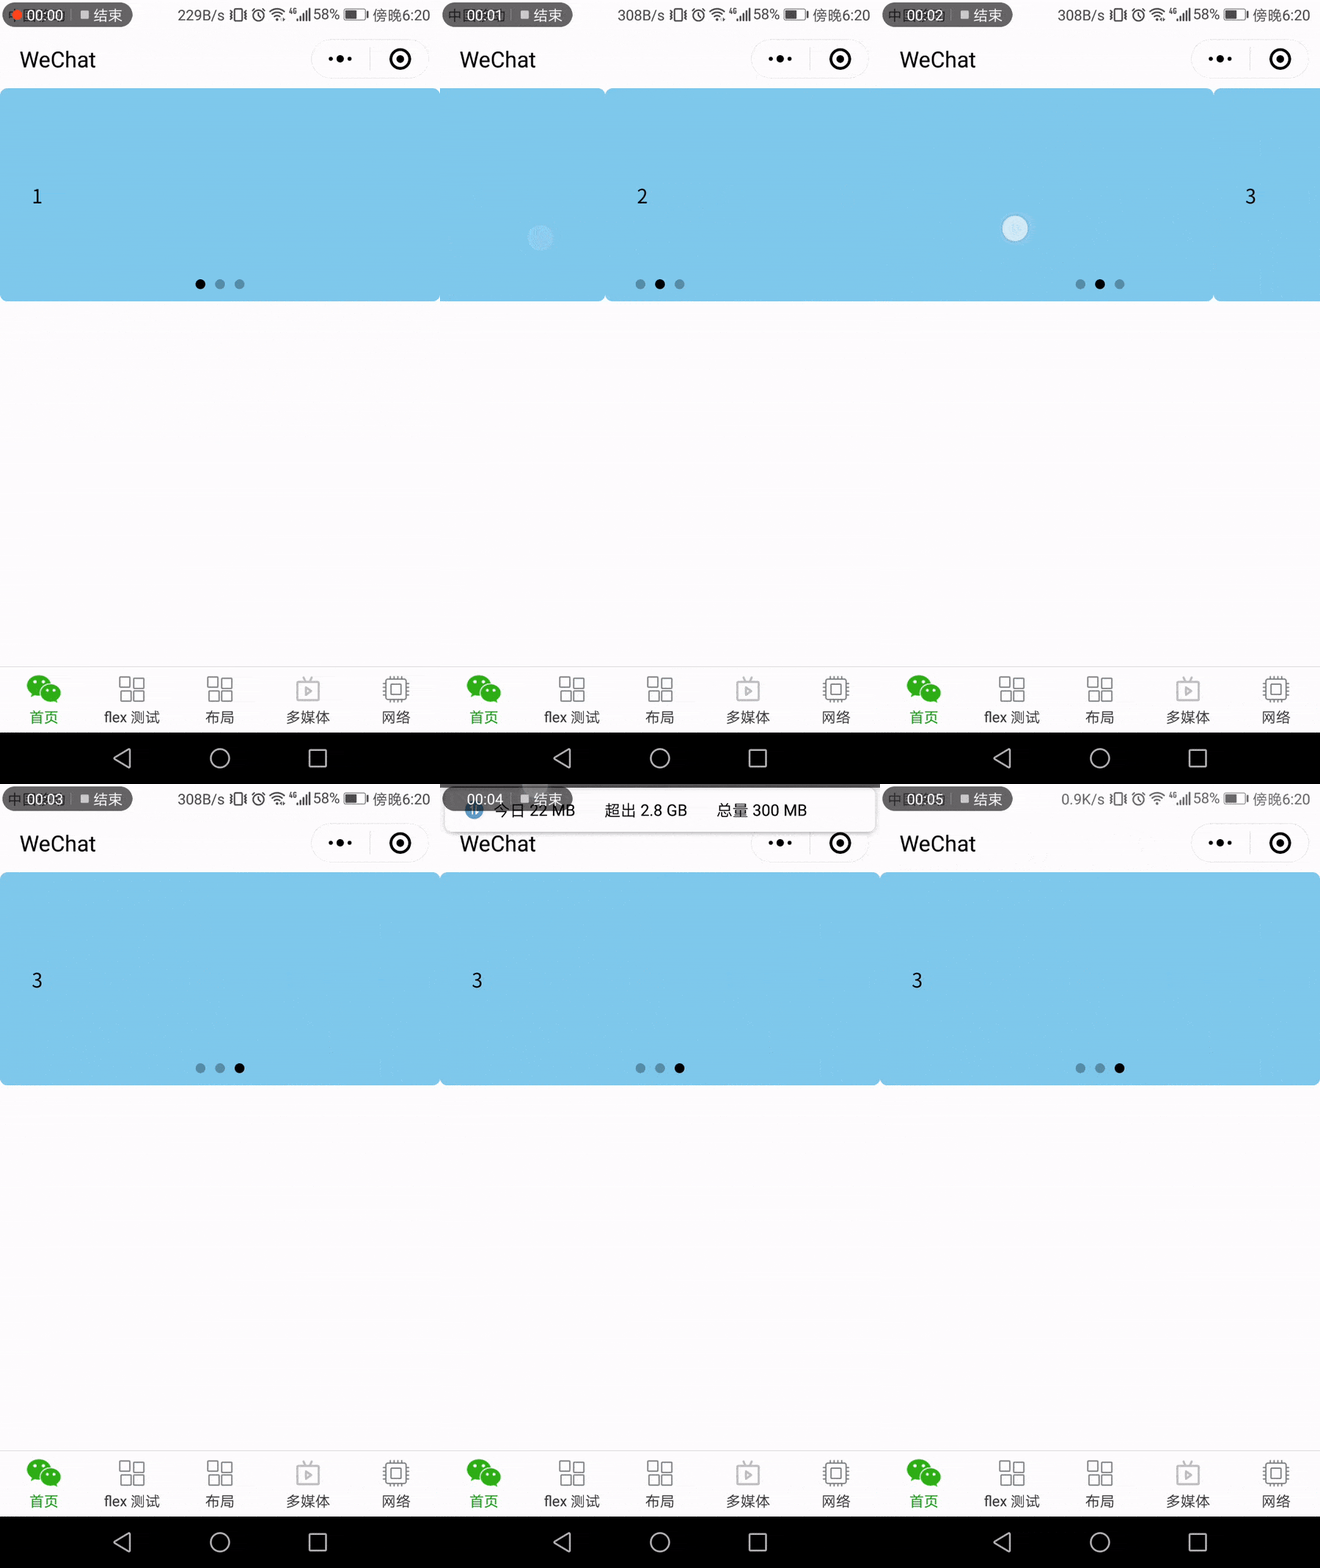
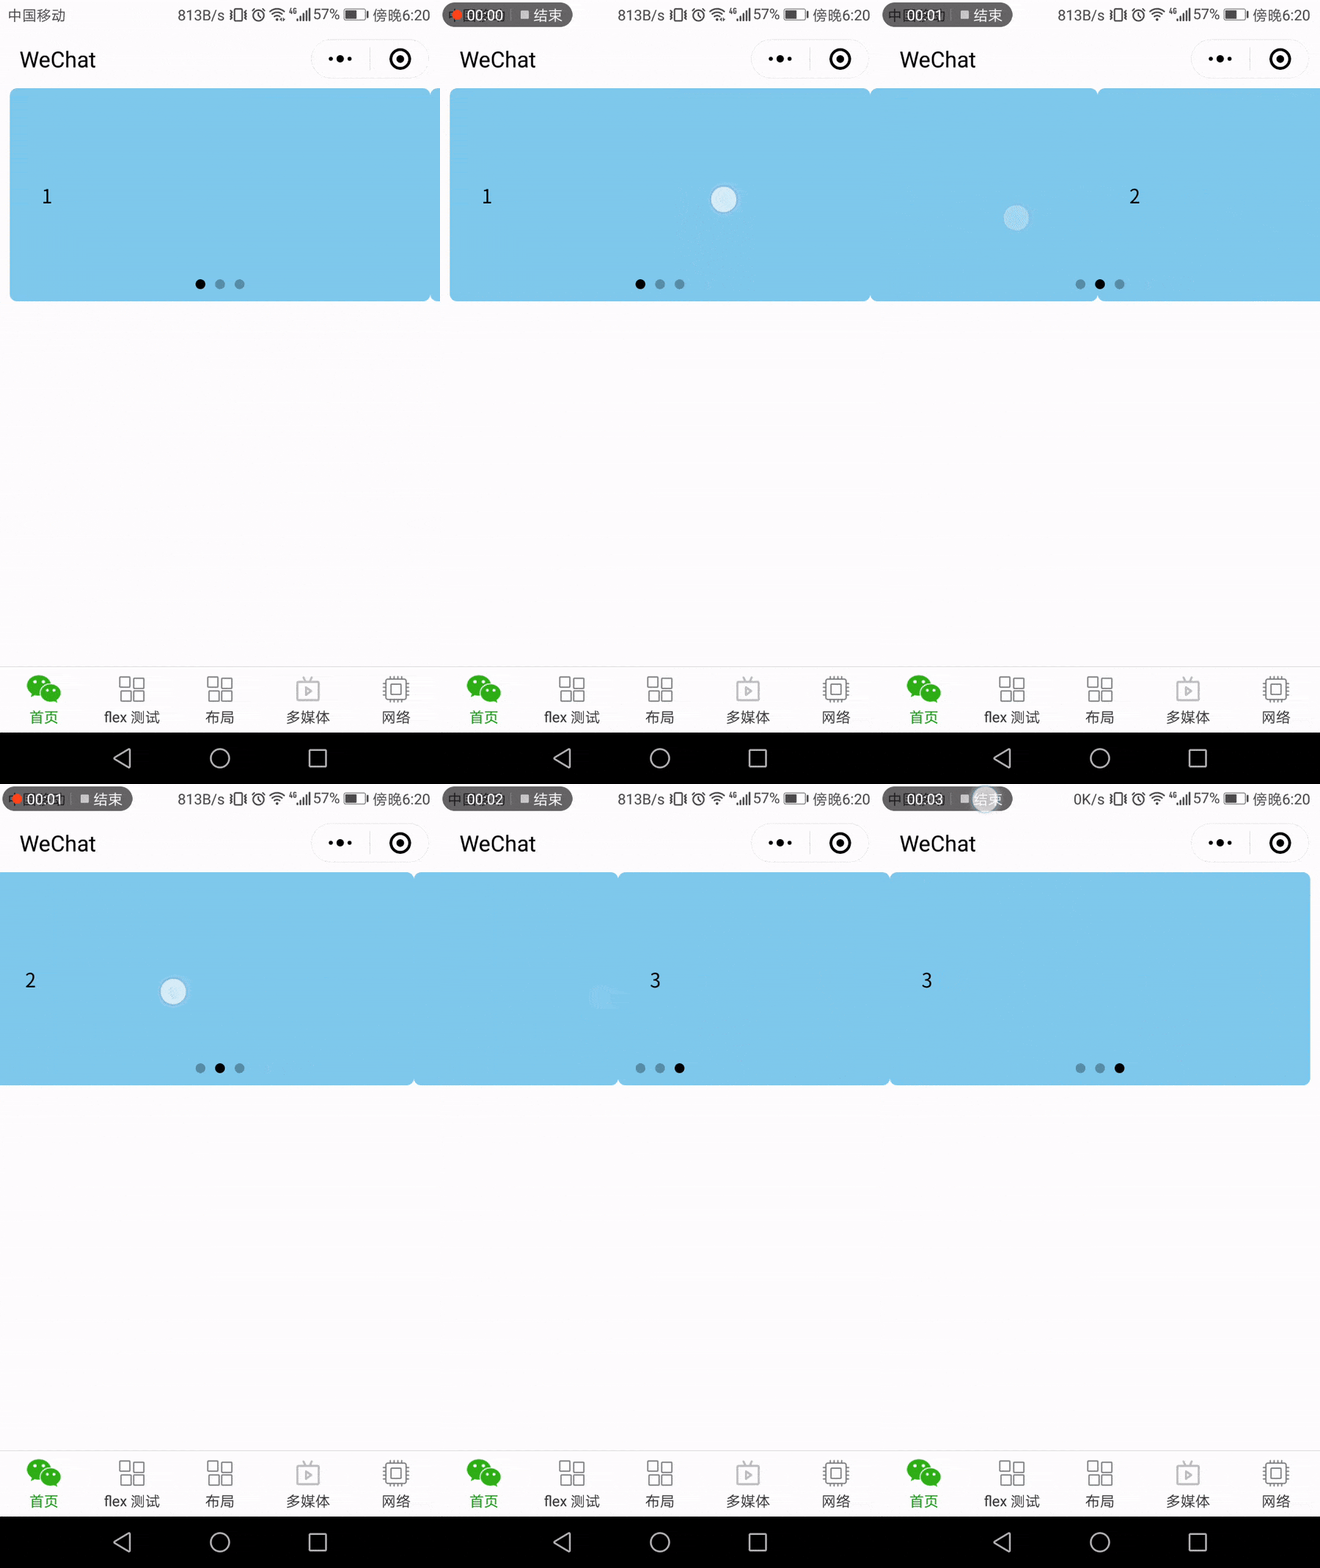
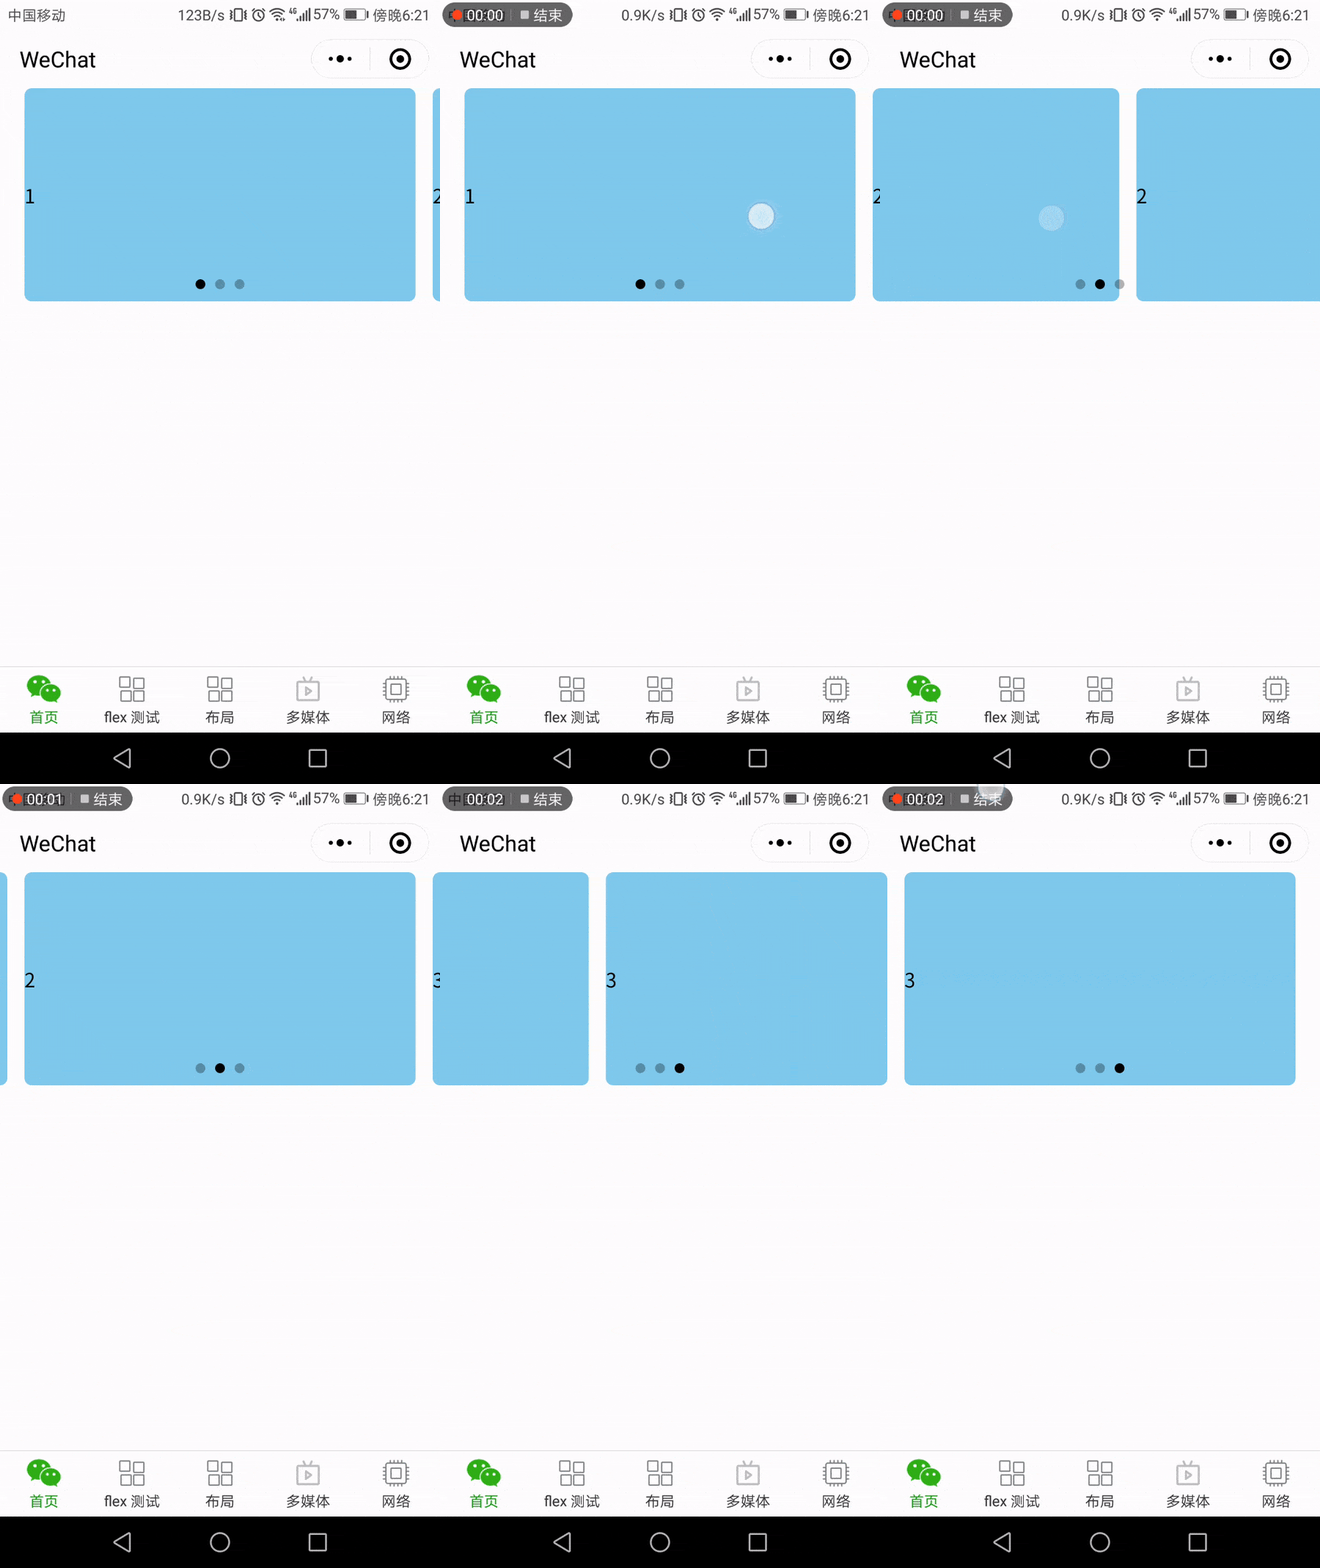
使用小程序的 swiper 组件,是能达到常规的 swiper 功能的,但是原生提供的样式有限,通常为图1、图2的样式。

通过样式的处理可达到图3的效果。示例代码如下:

1
2
3
4
5
6
7
8
9
10
11
12
13
14
15
16
17
18
19
20
21
22
23
24
25
26
27
28
29
30
31
32
33
34
35
36
37
38
39
40
41
42
43
44
45
46
47
48
49
50
51
52
53
// wxml
<swiper indicator-dots="{{true}}" previous-margin="8px" next-margin="8px" bindchange="bindSwiperChange">
<swiper-item wx:for="{{[1, 2, 3]}}" wx:key="{{index}}" class="swiperItem">
<view class="ruleCard {{currentSwiperItem < index && 'hiddenLeft'}} {{currentSwiperItem > index && 'hiddenRight'}}">
{{item}}
</view>
</swiper-item>
</swiper>
// js
Page({
data: {
currentSwiperItem: 0,
},
bindSwiperChange(e) {
this.setData({
currentSwiperItem: e.detail.current,
});
},
});
// wxss
swiper {
width: 100vw;
height: 363rpx;
}
.swiperItem {
display: flex;
justify-content: center;
width: calc(100vw - 16px) !important;
}
.ruleCard {
display: flex;
flex-direction: column;
justify-content: center;
width: calc(100vw - 40px);
height: 363rpx;
background: skyblue;
background-size: cover;
border-radius: 6px;
}
.hiddenLeft {
position: relative;
left: -10px;
}
.hiddenRight {
position: relative;
right: -10px;
}

小程序基础 api

发表于 2018-08-25   |   分类于 WeChat

登录、授权

因为调用后台的请求都需要带着 cookie,所以一定是先执行登录逻辑。在 app.ts 的 onLaunch 方法中,执行 wx.login 拿到 code 再调用后台的登录方法,登录成功后保存 cookie,查询用户信息 viewer,再进行获取用户信息授权的操作,获取用户信息后调用后台方法记录到数据库。

1
2
3
4
5
6
7
8
9
10
11
12
13
14
15
16
17
18
19
20
21
22
23
24
25
26
27
28
29
30
31
32
33
34
35
36
37
38
39
40
41
42
43
44
45
46
47
48
49
50
51
52
53
54
55
56
57
58
59
60
61
62
63
64
65
66
67
68
69
70
71
72
73
74
75
76
77
78
79
80
81
82
83
84
85
86
87
88
89
90
91
92
93
94
import { setCookie } from './actions/cookie';
import { LocationParam, updateLocation } from './actions/router';
import { setUserInfo } from './actions/userInfo';
import config from './config';
import configureStore from './configureStore';
import { query } from './createApolloClient';
import updateOwnerInfo from './graphql/updateOwnerInfo';
import viewer from './graphql/viewer';
import Provider from './utils/Provider';
const configuredStore = configureStore();
const appConfig: wx.AppParam = {
getUserInfo() {
wx.getUserInfo({
fail: () => {
this.globalData.authorized = false;
wx.redirectTo({
url: '/pages/authorize/authorize',
});
},
success: res => {
this.saveUserInfo(res.userInfo);
// 后台保存用户信息
query({
query: updateOwnerInfo,
variables: {
input: {
wxInfo: res.userInfo,
},
},
});
},
withCredentials: true,
});
},
saveUserInfo(userInfo: wx.UserInfo) {
this.globalData.authorized = true;
configuredStore.store.dispatch(setUserInfo(userInfo));
},
onLaunch() {
wx.showLoading({
title: '加载中',
mask: true,
});
// 登录
wx.login({
success: res => {
if (res.code) {
wx.request({
url: `${config.requestUrl}/api/login`,
data: {
code: res.code,
},
method: 'POST',
success: (requestRes: any) => {
console.log('登录成功===', requestRes);
const cookie = requestRes.data.cookie || '';
this.globalData.cookie = cookie;
configuredStore.apolloClient.query({
query: viewer,
});
configuredStore.store.dispatch(setCookie(cookie));
wx.hideLoading();
// 授权,放着这里是因为获取用户信息后需要同步到后端,需要 cookie
this.getUserInfo();
},
});
} else {
console.log('登录失败===', res);
}
},
});
// 记录屏幕宽度
this.globalData.windowWidth = wx.getSystemInfoSync().windowWidth;
},
onHide() {
// 小程序退到后台时触发
// configuredStore.persistStore();
},
onLocationChange(param: LocationParam) {
configuredStore.store.dispatch(updateLocation(param));
},
globalData: {
authorized: false,
cookie: '',
apolloClient: configuredStore.apolloClient,
query,
persistStore: configuredStore.persistStore,
store: configuredStore.store,
},
};
App(Provider(configuredStore.store)(appConfig));

但是这里存在一个问题,常见的出现时机是在分享出去的页面,虽然也会先进入 app.ts 文件,但是这里的 login 还没有返回就执行了其它 Page 页面的网络请求,这些网络请求就会报没有权限,而在 login 成功后有了 cookie,也没有办法触发重新发起网络请求。正常的思路应该是等待 app.ts 中初始化的一系列操作完成后再进入其它 Page 页面,但是目前无法达到这个效果,小程序社区中也有人提出相同的疑惑。目前只能在分享出去的页面中发起网络请求的地方进行统一的 cookie 验证,如果没有登录则先进行登录,但是可能存在进行两次 login 请求的问题。

操作相册权限

点击按钮保存图片到系统相册,默认情况下系统会弹框要求用户允许保存图片或视频到相册,当用户点击允许就是进行了“保存的相册”的授权,但是当用户点击不允许后,再点击按钮保存图片就静默失败了,没有任何反应,因此需要进行该种情况的处理。

微信社区里给出的方案是点击按钮时获取用户授权信息,如果其中有保存到相册的权限,则进行保存;否则,给出提示框引导用户进入权限设置页面。在设置页面如果授权了“保存的相册”,则关闭提示框,否则不关闭提示框,这样用户从设置页面返回后还是能看到提示框,表示并未授权。

示例代码如下:

1
2
3
4
5
6
7
8
9
10
11
12
13
14
15
16
17
18
19
20
21
22
23
24
25
26
27
28
29
30
31
32
33
34
35
36
Page({
...
saveClockImage(this: PageData) {
wx.getSetting({
success: settingRes => {
// 注意此处判断条件,如果从没有过授权或者授权为 true 则进入,如果从没授权过 getSetting 返回是没有 writePhotosAlbum 的,直接进行下载系会弹出系统授权框,此后就都能拿到 writePhotosAlbum 的值了
if (settingRes.authSetting['scope.writePhotosAlbum'] !== false) {
// 下载图片
wx.downloadFile({
url: this.data.clockImageUri,
success: res => {
if (res.statusCode === 200) {
// 保存到相册
wx.saveImageToPhotosAlbum({
filePath: res.tempFilePath,
success: () => {
wx.showToast({
title: '保存成功',
icon: 'success',
duration: 3000,
});
},
});
}
},
});
} else {
// 显示自定义的弹出框
this.setData({
showDialog: true,
});
}
},
});
},
});
1
2
3
4
5
6
7
8
9
10
11
12
<view wx:if="{{show}}" class="mask {{show ? 'showMask' : 'hideMask'}}" catchtap="_handleHidden">
<view class="dialog {{show ? 'showDialog' : 'hideDialog'}}" catchtap="_stopPropagation">
<view class="title">尚未授权</view>
<view class="description">尚未授权使用访问你的相册,现在去设置</view>
<view class="buttonContainer">
<button class="cancelBtn" bindtap="_handleHidden">取消</button>
<view class="columnDivider" />
<!-- 注意 open-type 取值 -->
<button class="confirmBtn" open-type="openSetting" bindopensetting="_handleConfirm">设置</button>
</view>
</view>
</view>

分享

关于分享的逻辑参考官方文档就可以,经过试验结论如下:withShareTicket 参数,只有在分享到一个群时(非个人、非多个群),在 success 回调中才可以获取到 shareTickets 值,经过 wx.getShareInfo 及解密的处理可以拿到群对当前小程序的唯一 ID,wxml 中使用 <open-data type="groupName" open-gid="xxxxxx" /> 可展示群名称。如果想进行任意的分享及打开分享时能进行关联关系的绑定,还是需要使用 path 中传入参数的形式,自己制定参数规则进行处理。

目前小程序无法直接分享到朋友圈,社区中有提供方案在后端生成小程序码,返回图片给前端,用户自己将图片保存到相册,然后自己在朋友圈转发。但是,社区中也有描述因诱导分享朋友圈审核不通过的。

支付

先请求后台创建订单,拿着订单 ID 获取支付参数,然后再执行 wx.requestPayment 发起支付。

1
2
3
4
5
6
7
8
9
10
11
12
13
14
15
16
17
18
19
20
21
22
23
24
25
26
27
28
29
30
31
32
33
34
35
36
37
38
39
40
41
// 创建订单
app.globalData.query({
query: createOrderMutation,
variables,
}).then((createOrderRes: any) => {
if (createOrderRes.errors) {
wx.showToast({
title: '创建订单失败',
icon: 'none',
});
} else {
// 获取支付参数
wx.request({
url: `${config.requestUrl}/api/beecloud/forward`,
data: {
bill_no: createOrderRes.data.createOrder.id,
},
header: {
cookie: app.globalData.cookie,
},
method: 'POST',
success: (requestRes: any) => {
// 发起支付
wx.hideLoading();
wx.requestPayment({
timeStamp: requestRes.data.timestamp,
nonceStr: requestRes.data.nonce_str,
package: requestRes.data.package,
signType: requestRes.data.sign_type,
paySign: requestRes.data.pay_sign,
success: () => {
// 支付成功后的操作
...
},
});
},
});
}
}).catch((createOrderError: any) => {
throw createOrderError;
});

微信小程序开发基础2

发表于 2018-08-25   |   分类于 WeChat

开发过程中的发现

  • wx:for 可以变量对象,wx:for-index 为对象的 key,wx:for-item 为对象的值
  • wx.getBackgroundAudioManager() 获取到的值,是可能随时发生变化的,如下情况的代码,在两次输出时可能会返回不同的值

    1
    2
    3
    4
    const backgroundAudioManager = wx.getBackgroundAudioManager();
    console.log(backgroundAudioManager.src);
    ...
    console.log(backgroundAudioManager.src);
  • WXML 中参数命名为 data-live-id,在 js 中调用的事件处理函数中通过参数 e.target.dataset.liveId 获取;命名为 data-liveId,通过参数 e.target.dataset.liveid 获取

  • scroll-view 设置 scroll-into-view 有时候没有效果,目前已知在先设置了 scroll-into-view 值,但是页面由于数据的处理还没有完成进行的是初始空列表的渲染,此时无法滚动到指定位置
  • 在点击页面返回按钮时如果想指定返回层级数,可以在 onUnload() 生命周期方法中,调用 getCurrentPages() 获取整个路由栈中的所有信息,来决定返回返回几级页面 wx.navigateBack({ delta: 1 });,但是可能存在中间页面显示一下就消失的效果
  • 图片的名称不要用汉字,在真机上(华为荣耀8)可能找不到资源
  • 对于图片高度未知的情况,可能存在图片被压缩了然后又正常显示的情况,可以设置图片的 height: auto; 或者添加 image 组件的 bindload 回调,控制图片在加载完成后再显示出来
  • 如果有富文本的内容需要后端返回,因为 web-view 有一些限制,为了降低开发成本可以使用长图的形式
  • onUnload 是页面元素已经卸载后的回调,目前小程序没有提供页面元素卸载前的回调,如果在 onUnload 中进行获取页面元素的操作可能会报错
  • 官方文档中描述,wx:if 有更高的切换消耗而 hidden 有更高的初始渲染消耗,如果需要频繁切换的情景下,用 hidden 更好,如果在运行时条件不大可能改变则 wx:if 较好
  • 100vh 指的是去掉顶部 Header 和底部 TabBar (如果存在) 后的高度,wx.getSystemInfo() 返回的理论上也是去掉顶部 Header 和底部 TabBar (如果存在) 后的高度,但存在适配问题,在 android 机上不同页面调用可能返回不同的值

参考组件

弹幕 doomm
滑动删除 wepy-swipe-delete(考虑封装)
小程序官方示例
小程序 Redux 绑定库
富文本解析 wxParse(考虑改为 ts)
可滑动 tabs(考虑封装)
赞组件库 zanui-weapp
MinUI 组件库
wepy基础 UI 组件

声明周期方法

// 初始化,显示 Page1 页面
App === onLaunch
App === onShow
Page1 === onLoad
Page1 === onShow
Page1 === onReady

// 跳转到 Page2 页面
Page1 === onHide
Page2 === onLoad
Page2 === onShow
Page2 === onReady

// 从 Page2 返回 Page1 页面
Page2 === onUnload
Page1 === onShow

// 切后台
Page1 === onHide
App === onHide

自定义 Component

自定义 Component 需要注意的主要是 Component 中调用调用处 Page 的方法的方式,以及自定义子组件的传入方式。

Page 的代码

page.json

1
2
3
4
5
{
"usingComponents": {
"voice": "/components/voice/voice",
}
}

page.js

1
2
3
4
5
6
7
Page({
...
handleVoiceSeek(e) {
// e.detail 内是 Component 传入的参数,还可通过 e.target.dataset.src 获取调用组件时传入的 data-src 参数
this.backgroundAudioManager.seek(e.detail.value);
},
});

page.wxml

1
2
3
4
5
6
7
8
9
10
11
12
13
14
<view>
<voice
data-src="{{particle.audio.uri}}"
bind:_handleVoiceSeek="handleVoiceSeek"
src="{{particle.audio.uri}}"
playing="{{true}}"
currentTime="{{particle.audio.currentTime}}"
duration="{{particle.audio.duration}}"
formatedCurrentTime="{{particle.audio.formatedCurrentTime}}"
formatedEndedTime="{{particle.audio.formatedEndedTime}}"
>
<view slot="content">这里是插入到组件slot中的内容</view>
</voice>
</view>

Component 的代码

component.json

1
2
3
{
"component": true
}

component.ts

1
2
3
4
5
6
7
8
9
10
11
12
13
14
15
16
17
18
19
20
21
22
23
24
25
26
27
28
29
30
31
Component({
options: {
multipleSlots: true, // 在组件定义时的选项中启用多slot支持
},
methods: {
_handleSeek(e) {
// 此处的参数 e 是 slider 传入的,触发调用处的 bind:_handleVoiceSeek 对应的 js 中定义的方法并传入参数,也就是调用 handleVoiceSeek 方法
this.triggerEvent('_handleVoiceSeek', { value: e.detail.value });
},
},
properties: {
src: {
type: String,
},
playing: {
type: Boolean,
},
currentTime: {
type: Number,
},
duration: {
type: Number,
},
formatedCurrentTime: {
type: String,
},
formatedEndedTime: {
type: String,
},
},
});

component.wxml

1
2
3
4
5
6
7
8
9
10
11
12
<view class="container">
<image wx:if="{{playing}}" class="icon" src="/images/pause.png" />
<image wx:else class="icon" src="/images/play.png" />
<view class="sliderContainer">
<slider min="0" max="{{duration}}" value="{{currentTime}}" bindchange="_handleSeek" />
<view class="time">
<text>{{formatedCurrentTime}}</text>
<text>{{formatedEndedTime}}</text>
</view>
</view>
<slot name="content" />
</view>

探索页面卸载前的监听、页面返回监听、退出小程序监听

目前小程序未提供这些功能!

探索是否自定义 Header 和 TabBar

在有些场景使用官方提供的 Header 和 TabBar 可能无法满足需求,官方会说可以使用自定的形式,但我查了下社区自定义可能存在不好处理的兼容性问题、android 原生事件无法监听的问题。如果没有真的特别需要、必须自定义,暂时还是不要自定义了。

探索小程序运行原理

微信小程序运行在三端:iOS、Android 和 开发者工具。在 iOS 上,小程序的 javascript 代码是运行在 JavaScriptCore 中(苹果开源的浏览器内核);在 Android 上,小程序的 javascript 代码是通过 X5 内核来解析(QQ浏览器内核),X5 对 ES6 的支持不好,要兼容的话,可以使用 ES5 或者引入 babel-polyfill 兼容库;在开发工具上,小程序的 javascript 代码是运行在 nwjs(chrome内核)。

微信开发者工具编辑器的实现原理和方式:它本身也是基于WEB技术体系实现的,nwjs + react,nwjs 简单说就是node + webkit,node提供给本地api能力,webkit提供web能力,两者结合就能使用JS+HTML实现本地应用程序,wxml 转化为 html用的是 reactjs,包括里面整套的逻辑都是建构在 reactjs 之上的。既然有nodejs,打包时ES6转ES5可引入babel-core的node包,CSS补全可引入postcss和autoprefixer的node包(postcss和autoprefixer的原理看这里),代码压缩可引入uglifyjs的node包。

微信小程序的 JavaScript 运行环境即不是 Browser 也不是 Node.js。它运行在微信 App 的上下文中,不能操作 Browser context 下的 DOM,也不能通过 Node.js 相关接口访问操作系统 API。所以,严格意义来讲,微信小程序并不是 Html5,尽管开发过程和用到的技术栈和 Html5 是相通的。开发者写的所有代码最终将会打包成一份 JavaScript,并在小程序启动的时候运行,直到小程序销毁。

小程序的视图层目前使用 WebView 作为渲染载体,而逻辑层是由独立的 JavascriptCore 作为运行环境。在架构上,WebView 和 JavascriptCore 都是独立的模块,并不具备数据直接共享的通道。当前,视图层和逻辑层的数据传输,实际上通过两边提供的 evaluateJavascript 所实现。即用户传输的数据,需要将其转换为字符串形式传递,同时把转换后的数据内容拼接成一份 JS 脚本,再通过执行 JS 脚本的形式传递到两边独立环境。但是 evaluateJavascript 的执行会受很多方面的影响,数据到达视图层并不是实时的。

小程序代码包经过编译后,会放在微信的 CDN 上供用户下载,CDN 开启了 GZIP 压缩,所以用户下载的是压缩后的 GZIP 包,其大小比代码包原体积会更小。目前小程序打包是会将工程下所有文件都打入代码包内,也就是说,这些没有被实际使用到的库文件和资源也会被打入到代码包里,从而影响到整体代码包的大小。小程序启动时会从CDN下载小程序的完整包,一般是数字命名的,如:_-2082693788_4.wxapkg。

小程序正式部署使用 webpack 打的包,而在打包的过程中,把以下变量给屏蔽了:window,document,frames,self,location,navigator,localStorage,history,Caches,screen,alert,confirm,prompt,XMLHttpRequest,WebSocket。主要是为了管理和监控,如果这些对象你能访问,就可以像操作通常的网页一样操作小程序,这是绝对不被允许的。

所有的小程序最后基本都被打成上面的结构,其中:

  • WAService.js 框架JS库,提供逻辑层基础的API能力
  • WAWebview.js 框架JS库,提供视图层基础的API能力
  • WAConsole.js 框架JS库,控制台
  • app-config.js 小程序完整的配置,包含我们通过app.json里的所有配置,综合了默认配置型
  • app-service.js 我们自己的JS代码,全部打包到这个文件
  • page-frame.html 小程序视图的模板文件,所有的页面都使用此加载渲染,且所有的WXML都拆解为JS实现打包到这里
  • pages 所有的页面,这个不是我们之前的wxml文件了,主要是处理WXSS转换,使用js插入到header区域

微信小程序的框架包含两部分:AppView视图层,AppService逻辑层。AppView层用来渲染页面结构,所有的视图(wxml和wxss)都是单独的 WebView来承载。AppService层用来逻辑处理、数据请求、接口调用,整个小程序只有一个,并且整个生命周期常驻内存。它们在两个进程(两个 WebView)里运行,所以小程序打开至少就会有2个 WebView进程,由于每个视图都是一个独立的 WebView进程,考虑到性能消耗,小程序不允许打开超过5个层级的页面,当然同是也是为了体验更好。使用消息 publish 和 subscribe 机制实现两个 WebView之间的通信,实现方式就是统一封装一个 WeixinJSBridge 对象,而不同的环境封装的接口不一样。

对逻辑和UI进行了完全隔离,这个跟当前流行的react,agular,vue有本质的区别,小程序逻辑和UI完全运行在2个独立的WebView里面,而后面这几个框架还是运行在一个 WebView 里面的,如果你想还是可以直接操作 dom 对象进行 ui 渲染的。

微信自己写了2个工具:wcc 把 WXML 转换为 VirtualDOM;wcsc 把 WXSS 转换为一个 JS 字符串的形式通过 style 标签append 到 header 里。

探索图片适配问题

方式一:

1
2
3
4
5
6
7
8
9
10
@media (-webkit-min-device-pixel-ratio: 2),(min-device-pixel-ratio: 2){
.imgTest{
background: url(https://images/2x.png) no-repeat;
}
}
@media (-webkit-min-device-pixel-ratio: 3),(min-device-pixel-ratio: 3){
.imgTest{
background: url(https://images/3x.png) no-repeat;
}
}

方式二:

1
2
3
4
5
6
7
8
9
10
11
12
13
// 获取设备像素比,在 wxml 中根据不同像素比显示不同图片
const getPixelRatio = () => {
let pixelRatio = 0
wx.getSystemInfo({
success: function (res) {
pixelRatio = res.pixelRatio
},
fail: function () {
pixelRatio = 0
}
})
return pixelRatio
}

方式三:
只使用三倍图,或者说最大尺寸的图片,在样式中指定宽高。我个人和团队的 UI 设计师都倾向于使用这种方式,因为小程序限制上传代码的大小为 2M,尽量不使用多套图片,使用 UI 切好的大尺寸的图片在小尺寸手机上效果也不会有太大影响。

探索样式中不同单位的区别 px、rpx、rem、pt 等(待完成)

在显示屏上,每一个画面都是由无数的点阵形成的,这个点阵中,每一个点叫做像素,就是 pixel(缩写为 px),1px 所能代表的尺寸并非是一成不变的,同样 px 尺寸的元素,在高分屏上显示会明显要比在低分屏显得更小。css 中的 px 单位,是多个设备像素,1个css像素所对应的物理像素个数是不一致的,每英寸的像素的数量保持在96左右,因此设置为12px的元素,无论使用什么样的设备查看网页,字体的大小始终为1/8英寸。

px 像素,是一个点,点的大小是会变的,也称“相对长度”
pt 全称 point,1/72英寸,用于印刷业,也称“绝对长度”
dp = px (目标设备 dpi 分辨率 / 160)
rpx = px
(目标设备宽 px 值 / 750)
rem: 规定屏幕宽度为20rem;1rem = (750/20)rpx

dp 是以屏幕分辨率为基准的动态单位,而 rpx 是以长度为基准的动态单位,两者是不能直接进行互换的。

如果将微信小程序放到平板电脑上运行,屏幕的宽度 px 值有可能会变化(横竖屏、分屏模式等等),这时候,再以宽度为基准,就会出现元素显示不正确的问题,从这一点可以看出,微信团队目前并不希望将小程序扩展到手机以外的设备中。

微信小程序开发基础1

发表于 2018-08-25   |   分类于 WeChat

我们的项目中是使用 TypeScript 写代码,通过 rollup 编译成 javascript,在微信开发者工具打开 build 后的目录,即可运行,开发模式下在每次保存完代码后都会进行编译。仍使用 yarn add xxx 集成第三方 package,在使用 import 引入第三方依赖的时候,会将第三方文件打包进去,因此不用特殊处理。当然如果没有必要引用或者没有必要全部引用的,尽量不引用或引用局部文件,防止将所有文件都打包进去最终超过 2M 的限制。

请注意因为使用了 ts,再引入第三方 package 时,有时 ts 校验会报错,可以关闭一次编辑器重新打开确认一下是否真的有校验错误,我在引入 moment 时就遇到了这个问题,第一次引入时有校验报错,第二天再试时就好了。

编译后 process.env.NODE_ENV 的报错

使用 rollup 编译后的文件,在微信开发者工具中运行时,会由于没有 process 变量但引用了 process.env.NODE_ENV 而报错。解决办法是使用 rollup-plugin-replace 插件,在 rollup.config.js 配置文件中添加如下代码即可。

1
2
3
4
5
6
7
8
9
10
11
12
13
import replace from 'rollup-plugin-replace';
export default {
...
plugins: [
...
replace({
'process.env.NODE_ENV': JSON.stringify(
process.env.NODE_ENV || 'development',
),
}),
],
};

编译后 whatwg-fetch 中 this 为 undefined 的问题

项目中有安装包依赖了 whatwg-fetch,由于小程序既不是浏览器环境也不是 node 环境,其中使用的 this 编译后变成了 undefined。解决办法是在 rollup.config.js 配置中间中指定 whatwg-fetch 上下文即可,但这个上下文要是小程序中无需定义而存在的上下文,经过试验可使用 global 变量。代码如下。

1
2
3
4
5
export default {
moduleContext: {
[require.resolve('whatwg-fetch')]: 'global',
},
};

集成 Redux、Redux-Persist、Graphql、Apollo-Client

yarn add redux redux-persist
yarn add apollo-client graphql-tag

Redux的使用参考官方文档即可。小程序中不能使用 react-redux,为了能够像以前 react 使用 redux 一样在小程序中使用 redux,我参考了 小程序 Redux 绑定库,将其中的 warning.js、shallowEqual.js、wrapActionCreators.js、connect.js、Provider.js 简单修改为 ts 文件集成到项目中,就可以用使用 react-redux 的方式使用 redux 了。

在使用的过程中,connect 在 Page 上使用没有问题,但小程序中 Component 使用 connect 没有效果,这是因为 Component 的声明周期中没有 onLoad、onUnload,有的是 attached、detached 方法,因此修改 connect.ts 文件,通过传入固定参数 type 为 Component 来决定使用哪两个生命周期方法,这样支持了 Component 也能通过 connect 使用 redux。

使用 redux-persist 可以将 store 的整个数据保存到指定的 storage 中,如浏览器的 LocalStorage、react-native 的 AsyncStorage 等。将微信 storage 的 api 进行封装,也可直接使用redux-persist-weapp-storage,可指定使用微信的 storage。参考 redux-persist 的文档,将 store 存储到 storage 可使用 persistStore 方法,或将 active 置为 true 在每次 store 变化时都保存到 storage 中。但在程序初始化时将 storage 中保存的数据放入 store 的操作在文档中没找到,官方提供的方式是针对 react 组件的,我自己找了两种可以达到该效果的方式,一种是直接从 storage 中读出数据,另一种是使用 getStoredState 读出数据,具体代码参考下面。

Apollo-Client 默认是使用 fetch 进行网络请求的,但是小程序中没有 fetch,只能使用 wx.request 进行网络请求,在官方文档也没有找到可以自定义或传入 fetch 的方式。后来查了源码,在 new ApolloClient 的 networkInterface 参数中可以传入 query 参数,这样将 wx.request 进行封装通过 query 参数传入,就可以使用 Apollo-Client 进行网络请求了。在我们的项目中有使用轮询的需求,使用的是 Apollo-Client 的 watchQuery 方法,因为每次需要指定 pollInterval 参数,感觉不太方便管理,因此对 watchQuery 的使用进行了封装,具体代码参考下面。

现在虽然能使用 Apollo-Client 进行网络请求了,但还没有办法直接拿到请求返回的结果,在 Web 端是使用 react-apollo 的 compose 将请求结果通过 props 传入组件,但是小程序无法使用。目前我使用了两种不是很好的方式临时解决的这个问题,如果是 mutation,直接使用 then 来拿到返回结果,如果是 query,是在 mapPropsToState 中,使用 Apollo-Client 的 readQuery 拿到请求的返回结果,进行处理后传入 Page 的 data。

主要代码如下:

configureStore.ts

1
2
3
4
5
6
7
8
9
10
11
12
13
14
15
16
17
18
19
20
21
22
23
24
25
26
27
28
29
30
31
32
33
34
35
36
37
38
39
40
41
42
43
44
45
46
47
48
49
50
51
52
53
54
55
56
57
58
59
60
61
62
63
64
65
66
import ApolloClient from 'apollo-client';
import { applyMiddleware, combineReducers, createStore, Store } from 'redux';
import { getStoredState, persistReducer, persistStore } from 'redux-persist';
import thunk from 'redux-thunk';
import createApolloClient from './createApolloClient';
import reducer from './reducers/index';
import WxStorage from './storage';
interface CreateRootReducer {
apolloClient: ApolloClient;
}
function createRootReducer({ apolloClient }: CreateRootReducer) {
return combineReducers({
apollo: apolloClient.reducer(),
...reducer,
});
}
let store: Store<{}>;
export default function configureStore() {
const apolloClient = createApolloClient();
const middleware = [thunk, apolloClient.middleware()];
const enhancer = applyMiddleware(...middleware);
const rootReducer = createRootReducer({ apolloClient });
const persistConfig = {
// active: true, // store 在每次变化后都会同步保存到 storage 中
key: 'root',
storage: WxStorage,
version: 2,
};
const persistedReducer = persistReducer(persistConfig, rootReducer);
// 将 storage 中保存的数据初始化给 store
// 方式一
const storedState = wx.getStorageSync('persist:root');
const state: any = {};
if (typeof storedState === 'string' && storedState) {
const rawState = JSON.parse(storedState);
Object.keys(rawState).forEach(key => {
state[key] = JSON.parse(rawState[key]);
});
}
// 方式二
getStoredState(persistConfig)
.then(res => {
store.dispatch({
key: 'root',
payload: res,
type: 'persist/REHYDRATE',
});
})
.catch(error => {
throw error;
});
store = createStore(persistedReducer, {}, enhancer);
return {
apolloClient,
persistStore: () => persistStore(store), // 将 store 数据保存到 storage 中
store,
};
}

storage.ts

1
2
3
4
5
6
7
8
9
10
11
12
13
14
15
16
17
18
19
20
21
22
23
24
25
26
27
28
29
30
31
32
33
34
35
36
37
38
39
40
41
42
43
44
45
46
47
interface Storage {
getItem(key: string, ...args: any[]): any;
setItem(key: string, value: any, ...args: any[]): any;
removeItem(key: string, ...args: any[]): any;
}
const WxStorage: Storage = {
getItem: key =>
new Promise((resolve, reject) => {
wx.getStorage({
fail: res => {
reject(res);
},
key,
success: res => {
resolve(res.data);
},
});
}),
removeItem: key =>
new Promise((resolve, reject) => {
wx.removeStorage({
fail: res => {
reject(res);
},
key,
success: res => {
resolve(res);
},
});
}),
setItem: (key, data) =>
new Promise((resolve, reject) => {
wx.setStorage({
data,
fail: res => {
reject(res);
},
key,
success: res => {
resolve(res);
},
});
}),
};
export default WxStorage;

warning.ts

1
2
3
4
5
6
7
8
9
10
11
12
13
export default function warning(message: string) {
if (typeof console !== 'undefined' && typeof console.error === 'function') {
console.error(message);
}
try {
// This error was thrown as a convenience so that if you enable
// "break on all exceptions" in your console,
// it would pause the execution at this line.
throw new Error(message);
} catch (e) {
console.log(e);
}
}

shallowEqual.ts

1
2
3
4
5
6
7
8
9
10
11
12
13
14
15
16
17
18
19
20
21
22
23
24
25
export default function shallowEqual(objA: any, objB: any) {
if (objA === objB) {
return true;
}
const keysA = Object.keys(objA);
const keysB = Object.keys(objB);
if (keysA.length !== keysB.length) {
return false;
}
let result = true;
// Test for A's keys different from B.
const hasOwn = Object.prototype.hasOwnProperty;
keysA.forEach(keyA => {
if (!hasOwn.call(objB, keysA) || objA[keyA] !== objB[keyA]) {
result = false;
return false;
}
return;
});
return result;
}

wrapActionCreators.ts

1
2
3
4
5
6
7
8
9
10
11
12
13
14
15
16
17
18
19
20
21
22
23
24
25
26
27
28
29
30
31
32
33
34
35
36
function bindActionCreator(actionCreator: any, dispatch: any) {
return () => dispatch(actionCreator.apply(undefined, arguments));
}
function bindActionCreators(actionCreators: any, dispatch: any) {
if (typeof actionCreators === 'function') {
return bindActionCreator(actionCreators, dispatch);
}
if (typeof actionCreators !== 'object' || actionCreators === null) {
throw new Error(
'bindActionCreators expected an object or a function, instead received ' +
(actionCreators === null ? 'null' : typeof actionCreators) +
'. ' +
'Did you write "import ActionCreators from" instead of "import * as ActionCreators from"?',
);
}
const keys = Object.keys(actionCreators);
const boundActionCreators: any = {};
keys.forEach(actionKey => {
const tempActionCreator = actionCreators[actionKey];
if (typeof tempActionCreator === 'function') {
boundActionCreators[actionKey] = bindActionCreator(
tempActionCreator,
dispatch,
);
}
});
return boundActionCreators;
}
export default function wrapActionCreators(actionCreators: any) {
return (dispatch: any) => bindActionCreators(actionCreators, dispatch);
}

connect.ts

1
2
3
4
5
6
7
8
9
10
11
12
13
14
15
16
17
18
19
20
21
22
23
24
25
26
27
28
29
30
31
32
33
34
35
36
37
38
39
40
41
42
43
44
45
46
47
48
49
50
51
52
53
54
55
56
57
58
59
60
61
62
63
64
65
66
67
68
69
70
71
72
73
74
75
76
77
78
79
80
81
82
83
84
85
86
87
88
89
90
91
92
93
94
95
import shallowEqual from './shallowEqual';
import warning from './warning';
import wrapActionCreators from './wrapActionCreators';
const defaultMapStateToProps = (state: object) => {
console.log(state);
return {};
};
const defaultMapDispatchToProps = (dispatch: any) => ({ dispatch });
export default function connect(mapStateToProps: any, mapDispatchToProps: any) {
const shouldSubscribe = Boolean(mapStateToProps);
const mapState = mapStateToProps || defaultMapStateToProps;
const app = getApp();
let mapDispatch: any;
if (typeof mapDispatchToProps === 'function') {
mapDispatch = mapDispatchToProps;
} else if (!mapDispatchToProps) {
mapDispatch = defaultMapDispatchToProps;
} else {
mapDispatch = wrapActionCreators(mapDispatchToProps);
}
return function wrapWithConnect(pageConfig: any) {
function handleChange(this: any, options: any) {
if (!this.unsubscribe) {
return;
}
const state = this.store.getState();
const mappedState = mapState(state, options);
if (!this.data || shallowEqual(this.data, mappedState)) {
return;
}
this.setData(mappedState);
}
let { onLoad: pageConfigOnLoad, onUnload: pageConfigOnUnload } = pageConfig;
// 支持 Component 使用
if (pageConfig.type === 'Component') {
pageConfigOnLoad = pageConfig.attached;
pageConfigOnUnload = pageConfig.detached;
}
function onLoad(this: any, options: any) {
this.store = app.store;
if (!this.store) {
warning('Store对象不存在!');
}
if (shouldSubscribe) {
this.unsubscribe = this.store.subscribe(
handleChange.bind(this, options),
);
handleChange.call(this, options);
}
if (typeof pageConfigOnLoad === 'function') {
pageConfigOnLoad.call(this, options);
}
}
function onUnload(this: any) {
if (typeof pageConfigOnUnload === 'function') {
pageConfigOnUnload.call(this);
}
if (typeof this.unsubscribe === 'function') {
this.unsubscribe();
}
}
// 支持 Component 使用
if (pageConfig.type === 'Component') {
return Object.assign(
{},
pageConfig,
{
methods: {
...pageConfig.methods,
...mapDispatch(app.store.dispatch),
},
},
{
attached: onLoad,
detached: onUnload,
},
);
} else {
return Object.assign({}, pageConfig, mapDispatch(app.store.dispatch), {
onLoad,
onUnload,
});
}
};
}

Provider.ts

1
2
3
4
5
6
7
8
9
10
11
12
13
14
15
16
17
18
19
20
21
import warning from './warning';
function checkStoreShape(store: object) {
const missingMethods = ['subscribe', 'dispatch', 'getState'].filter(
m => !store.hasOwnProperty(m),
);
if (missingMethods.length > 0) {
warning(
'Store 似乎不是一个合法的 Redux Store对象: ' +
'缺少这些方法: ' +
missingMethods.join(', ') +
'。',
);
}
}
export default function Provider(store: object) {
checkStoreShape(store);
return (appConfig: object) => Object.assign({}, appConfig, { store });
}

config.ts

1
2
3
4
export default {
requestUrl: 'http://127.0.0.1:8888',
pollInterval: 3000,
};

createApolloClient.ts

1
2
3
4
5
6
7
8
9
10
11
12
13
14
15
16
17
18
19
20
21
22
23
24
25
26
27
28
29
30
31
32
33
34
35
36
37
38
39
40
41
42
43
44
45
46
47
48
49
50
51
52
53
54
55
56
57
58
59
60
61
62
63
64
import ApolloClient, {
createNetworkInterface,
ObservableQuery,
WatchQueryOptions,
} from 'apollo-client';
import config from './config';
interface CustomClient extends ApolloClient {
allQueryWatchers?: Set<ObservableQuery<{}>>;
watchQueryStart?: (options: WatchQueryOptions) => ObservableQuery<{}>;
}
// 封装通用 fetch,gql 返回类型就是 any
export const query = (input: any) => {
return new Promise(resolve => {
wx.request({
...input,
data: {
query: input.query.loc.source.body, // 获取查询语句字符串
variables: input.variables || {},
},
method: 'POST',
header: {
cookie: getApp().globalData.cookie,
},
fail: res => {
throw res;
},
success: res => {
resolve(res.data);
},
url: `${config.requestUrl}/graphql`,
});
});
};
const client: CustomClient = new ApolloClient({
networkInterface: {
...createNetworkInterface({
opts: {
credentials: 'include',
},
uri: `${config.requestUrl}/graphql`,
}),
query,
},
queryDeduplication: true,
addTypename: false,
reduxRootSelector: state => state.apollo,
});
export default function createApolloClient() {
client.allQueryWatchers = new Set();
// 封装通用 watchQuery,具有统一的轮询间隔
client.watchQueryStart = function(options: WatchQueryOptions) {
const queryWatcher = client.watchQuery(options);
queryWatcher.startPolling(config.pollInterval);
if (this.allQueryWatchers) {
this.allQueryWatchers.add(queryWatcher);
}
return queryWatcher;
};
return client;
}

发起 query 的示例如下:

1
2
3
4
5
6
7
8
9
10
11
12
13
14
15
16
17
18
19
20
21
22
23
24
25
26
import gql from 'graphql-tag';
const products = gql`
query Products {
products {
id
name
description
amount
code
lectures {
type
lecture {
... on Live {
__typename
id
name
startDate
endDate
}
}
}
}
}
`;
export default products;
1
2
3
4
5
6
7
8
9
10
11
12
13
14
15
16
17
18
19
20
21
22
23
24
25
26
27
28
29
30
31
32
33
34
35
36
37
38
import productsQuery from '../../graphql/products';
const pageConfig: wx.PageParam = {
onLoad() {
app.globalData.apolloClient.query({
query: productsQuery,
});
},
...
};
const mapStateToData = (state: any) => {
const pagesInstance = getCurrentPages();
let products: ProductType[] = [];
pagesInstance.forEach(page => {
// 通过路由判断找到当前 Page 实例,这样可以获取到当前页面的 data、options 等信息
if (page.route === 'pages/home/home') {
const data: ProductsType =
state.apollo.data.ROOT_QUERY && state.apollo.data.ROOT_QUERY[`products`]
? app.globalData.apolloClient.readQuery({
query: productsQuery,
})
: [];
if (data.products) {
products = data.products.map(product => {...});
}
}
});
return {
products,
};
};
const nextPageConfig = connect(mapStateToData, undefined)(pageConfig);
Page(nextPageConfig);

发起 mutation 的示例如下:

1
2
3
4
5
6
7
8
9
10
11
12
13
14
15
16
17
18
import gql from 'graphql-tag';
const createActivityRecord = gql`
mutation CreateActivityRecord(
$input: ActivityRecordInput!
$byOrder: Boolean
) {
createActivityRecord(input: $input, byOrder: $byOrder) {
id
product {
id
name
}
}
}
`;
export default createActivityRecord;
1
2
3
4
5
6
7
8
9
10
11
12
13
14
15
16
17
18
19
20
app.globalData.query({
query: createActivityRecord,
variables: {
input: {
activityId: this.data.activityId,
productId: this.data.productId,
ownerId: this.data.ownerId,
},
byOrder: false,
},
}).then((res: any) => {
if (res.data.errors) {
wx.showToast({
title: '操作失败',
icon: 'none',
});
} else {
this.sendFlowerSuccess();
}
});

集成 Lodash

yarn add lodash-es
yarn add -D @types/lodash-es

import debounce from ‘lodash-es/debounce’;
…

在使用的地方局部引用即可。在使用 debounce 方法时,会报下图所示的错误。原因是小程序没有全局的 window 对象,但查看源码只要有全局 self、global 之一即可,通过 console 输出看到小程序有 global 对象,因此在 app.ts 中添加如下代码,之后就可以正常使用 lodash 了。

1
2
3
4
5
6
7
8
9
10
11
12
13
14
15
16
17
18
// 全局 global 处理,lodash 中使用了 global
Object.assign(global, {
Array,
Date,
Error,
Function,
Math,
Object,
RegExp,
String,
TypeError,
setTimeout,
clearTimeout,
setInterval,
clearInterval,
});
App({...});

沟通问题

发表于 2018-08-23   |   分类于 沟通

2021-04-20 优先级协商

在一次使用看板的迭代中,任务没有安排优先级,都是自己根据情况开发,这种情况下,第一件要做的事,就是跟需要对接、合作的人确认自己所有任务的优先级,能够让自己流畅、无阻碍的开发,避免开发过程中可能产生等待的情况。

2021-04-20 方案确认

在做一个自己不熟悉的、不了解的事时,尤其是还需要重复多遍做这个事时,最好做之前与负责人(熟悉这个事的人)沟通解决方案,可能自己认为很简单、很理所当然的方式,在项目上由于一些特殊原因,这个方案都会有问题,提前确认避免返工。

做这种需要重复多遍的事时,还建议自己列一个工作步骤列表,每次做这个事都严格按照步骤来,防止中间忘了某一步导致项目错误。

2018-08-23 记

昨天发现了自己一个非常反常的行为,我还在尝试解决问题的过程中就问了我们老大当前的方案是不是可接受,虽然后来问题解决了,但我还是仔细思考了自己为什么会出现这种反常行为。通常我会把各种方法都尝试过、网上查了几遍后,如果还没解决问题才会向上汇报,而且我也非常明确的知道我们老大非常讨厌别人还没有上网查查有没有解决方案就去问他。跟着我的心去思考了一下,我发现是因为之前有人问了我什么时候能提审,我觉得他在催我,所以着急了。但实际上人家可能不是催我的意思,只是问问,《关键对话》中强调过不要对别人说的话主观臆断,导致自己产生情绪或产生其它不好的影响。所以第二天我就跟这位同事简单聊了聊,表示以后他可以把期望的时间直接说出来,我也会把当前的情况跟他描述一下,双方对当前的进度及项目要求的时间达成一致,而不是互相去猜对方想要的是什么、会怎么做,逐步建立互相的信任。

解决问题的思路

发表于 2018-08-20   |   分类于 Ideas

项目重构后 Modal 组件样式不正确

我们的项目基于 create-react-app 重构后,运行一段时间突然发现 Modal 组件样式有问题了。现象是:通常的 Modal 样式是正确的,在一个固定地方点击的 Modal 样式不正确,而且一旦出现不对的样式后其它的 Modal 样式也不正确了。经过与正确的 Modal 对比样式,发现样式没有问题。无意中点击了编译后的 css 文件,发现 keyframes 不是 modules 命名的,而是命名为 a、b、c 等,被其它文件中同名的 keyframes 覆盖了。这也解释了为什么其它地方的 Modal 是正确的,而某个地方的 Modal 出现不正确样式后其它 Modal 都被影响了的问题。我的第一反应就是代码里面命名重复了,但查看代码发现没有问题。再仔细一看发现其它样式都是 modules 形式的,如类名为 .Modal_content__14s1u,只有 keyframes 不是,都是 a、b、c 这种形式的。

之后就开始查 webpack 相关编译的问题,没有解决方案。后来想起来,项目基于 create-react-app 后,webpack 配置相关的都是在 react-scripts 中配置的,也就是 create-react-app,去查了 issuse 列表,找到有人问相同的问题了,解决方式如下。

事后回想一下,我已经定位到时编译问题后,首先想到的就应该是 create-react-app 的问题,不应该盲目的乱查 webpack 配置相关的东西。切记遇到问题还需仔细思考,理清思路,准确定位,不应乱查。

1
2
3
4
5
6
7
8
9
10
11
// create-react-app/packages/react-scripts/config/webpack.config.prod.js
...
module.exports = {
...
optimization: {
minimizer: [
...,
new OptimizeCSSAssetsPlugin({ cssProcessorOptions: { safe: true } }),
],
},
};

奇怪问题

如果自己确认代码没有问题,但效果有奇怪的问题,尤其是移植过来的代码,跟原代码运行时效果不一样,首先考虑是否有包的版本有问题,将相关包的版本处理成一样的,再试试是否还存在问题。

常用思路

发表于 2018-08-17   |   分类于 Ideas

遇到如下一些问题时可参考的思路:

  • 缓存问题,可使用在 url 后面拼接当前时间参数的方式,url + '?' + Dare.parse(new Date())
  • 如果在一些 api 中报了页面路径不正确,确认后面是否多了或少了 /
  • 对于开发过程中还没定下来的页面,后期也可能会经常变化,尤其对于小程序这种上线需要审核的,可以考虑使用网络图片或 web-view 的方式,减少开发成本
  • 需要下载文件的需求,可考虑能否通过提供下载链接、在服务号中发送指定内容通过自动回复下载链接等方式满足需求
  • 如果需要在一个时候加入权限,这个权限相对固定,可以复制出一个新的项目,再在此基础上进行权限的设置
  • render 中可以循环遍历 props 进行显示,在render中定义局部变量,只要显示的位置在遍历之后,就可正常显示,必要时可使用 flex 布局调整页面显示顺序,但代码是先遍历后展示的
1…8910…17
© 2021 小朱
由 Hexo 强力驱动
主题 - NexT.Pisces