前端学习之路


  • 首页

  • 归档

  • 分类

  • 标签

  • 搜索
close
小朱

小朱

前端学习之路

168 日志
37 分类
37 标签
RSS
GitHub
友情链接
  • 极客学院
  • caniuse
  • codepen
  • JS Bin
  • Babel在线编译
  • Iconfinder图标
  • 在线JSON格式化
  • 智能图像压缩

styled-components

发表于 2019-12-11   |   分类于 React

介绍

styled-components 是一个针对 React 的 css in js 类库。和所有同类型的类库一样,通过 js 赋能解决了原生 css 所不具备的能力,比如变量、循环、函数等。解决了 css 全局命名空间,避免样式冲突的问题,维护起来更加方便。

优点

  • 贯彻 React 的 everything in JS 理念,降低 js 对 css 文件的依赖
  • 保留前端开发 CSS 书写习惯,无学习和迁移成本
  • 使用方便,不需要配置 webpack,开箱即用
  • 不用再担心样式命名的问题,移除样式与组件之间的对应关系
  • 样式可以使用变量,更加灵活
  • 组件的逻辑、生命周期、样式、结构完全和其它组件解耦,对组件维护很有帮助

缺点

  • 可读性差,不方便直接看出组件的 html 元素

开发环境

IDE 插件

VSCode 插件 vscode-styled-components

Babel 配置

1
2
3
4
5
6
7
8
9
10
11
12
13
...
"plugins": [
[
"babel-plugin-styled-components",
{
"ssr": true,
"displayName": true,
"fileName": false,
"preprocess": false
}
]
],
...

stylelint 配置

1
2
3
4
5
6
7
8
9
...
"processors": [
"stylelint-processor-styled-components"
],
"extends": [
"stylelint-config-recommended",
"stylelint-config-styled-components"
],
...

使用

1
2
3
4
5
6
7
8
9
10
const Button = styled.button`
background: ${props => props.primary ? "blue" : "white"};
`;
render(
<div>
<Button>Normal</Button>
<Button primary>Primary</Button>
</div>
);
1
2
3
4
5
6
7
8
const Button = styled.button`
color: blue;
border-radius: 3px;
`;
const TomatoButton = styled(Button)`
color: tomato;
`;
1
2
3
4
5
6
7
8
9
10
11
12
13
14
15
16
const Button = styled.button`
display: inline-block;
color: blue;
font-size: 1em;
`;
const TomatoButton = styled(Button)`
color: tomato;
`;
render(
<div>
<Button>Normal Button</Button>
<Button as="a" href="/">Link with Button styles</Button>
<Button as={TomatoButton}>Custom Button with Normal Button styles</Button>
</div>
);
1
2
3
4
5
6
7
8
9
10
11
12
13
14
15
16
17
18
19
20
21
22
23
24
25
26
27
28
29
30
31
32
33
34
35
36
const Thing = styled.div`
color: blue;
&:hover {
color: red;
}
& ~ & {
background: yellow; // <Thing> as a sibling of <Thing>, but maybe not directly next to it
}
& + & {
background: green; // <Thing> next to <Thing>
}
&.something {
background: orange; // <Thing> tagged with an additional CSS class ".something"
}
.other-thing {
background: blue; // CSS class ".other-thing" inner <Thing>
}
.something-else & {
background: red; // <Thing> inside another element labeled ".something-else"
}
`
render(
<React.Fragment>
<Thing>Hello world!</Thing>
<Thing>green</Thing>
<Thing className="something">orange</Thing>
<Thing>
<div className="other-thing">blue</div>
</Thing>
<div>Pretty nice day today.</div>
<Thing>yellow</Thing>
<div className="something-else">
<Thing>red</Thing>
</div>
</React.Fragment>
)
1
2
3
4
5
6
7
8
9
10
11
12
13
14
15
16
17
18
const Input = styled.input.attrs(props => ({
// we can define static props
type: "password",
// or we can define dynamic ones
size: props.size || "1em",
}))`
font-size: 1em;
margin: ${props => props.size};
padding: ${props => props.size};
`;
render(
<div>
<Input placeholder="A small text input" />
<br />
<Input placeholder="A bigger text input" size="2em" />
</div>
);
1
2
3
4
5
6
7
8
9
10
11
12
13
14
15
16
const rotate = keyframes`
from {
transform: rotate(0deg);
}
to {
transform: rotate(360deg);
}
`;
const Rotate = styled.div`
display: inline-block;
animation: ${rotate} 2s linear infinite;
`;
render(
<Rotate>&lt; 💅 &gt;</Rotate>
);
1
2
3
4
5
6
7
8
9
10
11
12
13
14
15
16
17
18
19
20
21
22
23
24
25
26
27
28
29
30
31
32
33
const Button = styled.button`
color: ${props => props.theme.fg};
border: 2px solid ${props => props.theme.fg};
background: ${props => props.theme.bg};
`;
Button.defaultProps = {
theme: {
fg: "mediumseagreen"
bg: "white",
}
};
const theme = {
fg: "palevioletred",
bg: "white"
};
const invertTheme = ({ fg, bg }) => ({
fg: bg,
bg: fg
});
render(
<div>
<Button>mediumseagreen</Button>
<ThemeProvider theme={theme}>
<div>
<Button>Default Theme</Button>
<ThemeProvider theme={invertTheme}>
<Button>Inverted Theme</Button>
</ThemeProvider>
</div>
</ThemeProvider>
</div>
);
1
2
3
4
5
6
7
8
9
10
import { withTheme } from 'styled-components';
class MyComponent extends React.Component {
render() {
console.log('Current theme: ', this.props.theme);
// ...
}
}
export default withTheme(MyComponent);
1
2
3
4
5
6
7
8
9
import { useContext } from 'react';
import { ThemeContext } from 'styled-components';
const MyComponent = () => {
const themeContext = useContext(ThemeContext);
console.log('Current theme: ', themeContext);
// ...
}
1
2
3
4
5
6
7
8
9
10
11
12
13
14
15
16
17
const Button = styled.button`
color: ${props => props.theme.main};
`;
const theme = {
main: "mediumseagreen"
};
render(
<div>
<Button theme={{ main: "royalblue" }}>royalblue</Button>
<ThemeProvider theme={theme}>
<div>
<Button>mediumseagreen</Button>
<Button theme={{ main: "darkorange" }}>darkorange</Button>
</div>
</ThemeProvider>
</div>
);

JavaScript-练习题

发表于 2019-12-10   |   分类于 JavaScript
1
2
3
4
5
6
7
8
var a = 100;
function testResult() {
var b = 2 * a;
var a = 200; // 这里的 a 会覆盖外面的 a
var c = a / 2;
console.log(b, c); // NaN 100
}
testResult();
1
2
3
4
5
6
7
8
9
10
11
function createFunctions() {
var result = new Array();
for(var i = 0; i < 10; i++) {
var j = i;
result[i] = function() {
return j; // j 存在变量提升,循环结束后 j 为 9
}
}
return result;
}
createFunctions().forEach(item => console.log(item())) // 10 个 9
1
2
3
4
5
6
7
8
9
10
11
12
13
var myObject = {
foo: 'bar',
func: function() {
var self = this;
console.log('outer func:this.foo = ', this.foo); // bar
console.log('outer func:self.foo = ', self.foo); // bar
(function(){// 立即执行函数,没有 this
console.log('inner func:this.foo = ', this.foo); // undefined, this 指向 window
console.log('inner func:self.foo = ', self.foo); // bar
}());
}
};
myObject.func();

React-SSR

发表于 2019-12-10   |   分类于 React

How to implement server-side rendering in your React app in three simple steps
React 服务端渲染从入门到精通

什么是服务端渲染

当用户或爬虫程序访问页面 URL 时,将组件或页面通过服务器生成 HTML 字符串,再发送到浏览器,最后将静态标记”混合”为客户端上完全交互的应用程序。服务端渲染只发生在首屏,在客户端处理后面的请求。

服务端渲染和客户端渲染的区别

  • 客户端渲染时,浏览器下载一个最小的 HTML 页面,渲染 JavaScript 并填充进去
  • 服务端渲染时,在服务端渲染 React 组件,输出 HTML 内容

可以组合使用这 2 种方式创建同构应用

如何在页面中快速判断是否为服务端渲染

  • 鼠标右键查看源代码,在页面中看到的内容在源代码中也可以查看到,则是服务端渲染得到的
  • 鼠标右键查看源代码,页面中看到的内容在源代码中不可以查看到,则是客户端渲染得到的

在服务端渲染 React 的后果

  • 如果应用很小,服务端渲染可以改善性能,但是如果应用很大会降低性能
  • 增大了响应时间,如果服务器很忙会更糟糕
  • 增大了响应大小,这意味着需要更长的时间来加载页面
  • 增大了应用的复杂度
  • 在服务端渲染时只会执行到 componentDidMount 之前的生命周期钩子,一些常用的浏览器的 api 可能无法正常使用

什么时候应该使用服务端渲染

  • SEO,目前搜索引擎爬虫还不能解析 JavaScript,这是使用服务端渲染最主要的原因,特别是对于着陆页
  • 改善性能,在服务端渲染时,应用的性能依赖服务器的资源和用户的网速,这使服务端渲染对于内容密集型网站非常有用;另一个改善是首次用户交互时间,减少白屏等待时间

如何工作

  • 首次访问页面时创建一个新的 Redux Store
  • 选择性的 dispatch action,服务端渲染时客户端不需要初始化 state 的 action
  • 从 Store 中拿到 state 执行 SSR
  • 将上一步获取到的 state 一起返回,用这个 state 在客户端初始化 state
1
2
3
4
5
6
7
// server rendered home page
app.get('/', (req, res) => {
const { preloadedState, content } = ssr(initialState);
const response = template('Server Rendered Page', preloadedState, content);
res.setHeader('Cache-Control', 'assets, max-age=604800');
res.send(response);
});
1
2
3
4
5
6
7
8
9
10
11
12
13
14
15
16
function ssr(initialState) {
// Configure the store with the initial state provided
const store = configureStore(initialState);
// render the App store static markup ins content variable
let content = renderToString(
<Provider store={store}>
<App />
</Provider>
);
// Get a copy of store data to create the same store on client side
const preloadedState = store.getState();
return { content, preloadedState };
}
1
2
3
4
5
6
7
8
9
10
11
12
13
14
15
16
17
18
19
20
21
22
23
24
25
26
27
28
29
30
31
32
33
34
function template(title, initialState = {}, content = '') {
// Dynamically ship scripts based on render type
let scripts = '';
if (content) {
// 服务端渲染
scripts = ` <script>
window.__STATE__ = ${JSON.stringify(initialState)}
</script>
<script src="assets/client.js"></script>
`;
} else {
// 客户端渲染
scripts = ` <script src="assets/bundle.js"> </script> `;
}
let page = `<!DOCTYPE html>
<html lang="en">
<head>
<meta charset="utf-8">
<title> ${title} </title>
<link href="assets/style.css" rel="stylesheet">
</head>
<body>
<div class="content">
<div id="app" class="wrap-inner">
<!--- magic happens here --> ${content}
</div>
</div>
${scripts}
</body>
`;
return page;
}
1
2
3
4
5
6
7
8
9
10
11
12
13
14
15
16
17
18
19
20
21
22
23
24
25
26
27
28
// client.js
import React from 'react';
import { hydrate } from 'react-dom';
import { Provider } from 'react-redux';
import configureStore from './redux/configureStore';
import App from './components/app';
// Read the state sent with markup
const state = window.__STATE__;
// delete the state from global window object
delete window.__STATE__;
// reproduce the store used to render the page on server
const store = configureStore(state);
/**
* hydrate the page to make sure both server and client
* side pages are identical. This includes markup checking,
* react comments to identify elements and more.
*/
hydrate(
<Provider store={store}>
<App />
</Provider>,
document.querySelector('#app')
);

Mac-终端配置

发表于 2019-12-08   |   分类于 Mac
  • 安装 Homebrew
  • 安装 ZSH,安装成功可查看版本 zsh —version
  • 配置终端默认使用 ZSH chsh -s $(which zsh)
  • 安装 iTerm2 brew cask install iterm2
  • 配置 iTerm2 主题
    • 下载 iTerm2-Color-Schemes,
    • iTerm → Preferences → Profiles → Colors → Color Presets... → Import → OceanicMaterial
    • iTerm → Preferences → Profiles → Keys → Load Preset... → Natural Text Editing
  • 使用 Antigen 管理 ZSH 插件,brew install antigen
  • 编辑 ~/.zshrc,添加如下内容,执行 source ~/.zshrc

    1
    2
    3
    4
    5
    6
    7
    8
    9
    10
    11
    12
    13
    14
    15
    16
    17
    18
    19
    20
    21
    22
    23
    24
    25
    26
    27
    28
    29
    30
    31
    32
    33
    34
    35
    36
    37
    38
    39
    40
    41
    42
    43
    44
    45
    46
    47
    48
    49
    50
    51
    52
    # Antigen https://github.com/zsh-users/antigen
    source /usr/local/share/antigen/antigen.zsh
    DEFAULT_USER=`id -un`
    # Load the oh-my-zsh's library.
    antigen use oh-my-zsh
    # Bundles from the default repo (robbyrussell's oh-my-zsh).
    antigen bundle autojump
    antigen bundle aws
    antigen bundle docker
    antigen bundle git
    antigen bundle npm
    antigen bundle nvm
    antigen bundle osx
    antigen bundle react-native
    # zsh-nvm https://github.com/lukechilds/zsh-nvm
    NVM_LAZY_LOAD=true
    NVM_AUTO_USE=true
    antigen bundle lukechilds/zsh-nvm
    # Npm completion
    antigen bundle lukechilds/zsh-better-npm-completion
    antigen bundle akoenig/npm-run.plugin.zsh
    # Zsh completion
    antigen bundle zsh-users/zsh-completions
    # Auto suggestions
    ZSH_AUTOSUGGEST_USE_ASYNC=true
    antigen bundle zsh-users/zsh-autosuggestions
    # Syntax highlighting bundle.
    antigen bundle zdharma/fast-syntax-highlighting
    # Automatic update antigen bundles
    antigen bundle unixorn/autoupdate-antigen.zshplugin
    # Load the theme.
    # Powerlevel9k
    # https://github.com/bhilburn/powerlevel9k/wiki/Install-Instructions
    POWERLEVEL9K_INSTALLATION_PATH=$ANTIGEN_BUNDLES/bhilburn/powerlevel9k
    POWERLEVEL9K_MODE='nerdfont-complete'
    POWERLEVEL9K_SHORTEN_DIR_LENGTH=2
    POWERLEVEL9K_LEFT_PROMPT_ELEMENTS=(dir vcs)
    POWERLEVEL9K_RIGHT_PROMPT_ELEMENTS=(status nvm node_version)
    antigen theme bhilburn/powerlevel9k powerlevel9k
    # Tell Antigen that you're done.
    antigen apply
  • 配置 Powerlevel9k 主题

    • brew tap caskroom/fonts
    • brew cask install font-firacode-nerd-font
    • iTerm → Preferences → Profiles → Text → Change Font → Fura Code Nerd Font,勾选 Use ligatures
  • 配置 VS Code 配置终端,首选项 → 设置 → 用户,在 setting.json 中添加
    1
    2
    "terminal.integrated.shell.osx": "/bin/zsh",
    "terminal.integrated.fontFamily": "'FuraCode Nerd Font'",

讨论用户名

发表于 2019-12-06   |   分类于 Ideas

关于用户名的讨论

  • 用户名用需要从三个方面正确的识别用户,每个标识应该是独立的
    • 系统级标识,适合作为数据库的外键
    • 登录标识,适合进行证书检查
    • 公众标识,适合展示给其它用户
  • 如何保证唯一性
    • 不区分大小写,如 john_doe 和 JOHN_DOE
    • 选择一种形式进行标准化
    • 考虑非 ASCII,如 StraßburgJoe 和 StrassburgJoe
    • 使用 Unicode 库
    • 处理可能混淆的情况,如 jane_doe 和 jаne_doe
    • 如果是邮箱地址,忽略点或加号后面的字符
    • 保留一些名字,如 login、www、mail 等

用户账户、授权和密码管理的 12 个最佳实践

  • Hash those passwords 对密码进行散列处理
  • Allow for third-party identity providers if possible 如果可以的话,允许第三方提供身份验证
  • Separate the concept of user identity and user account 区分用户身份和用户账户的概念
  • Allow multiple identities to link to a single user account 允许单一用户账户关联多重身份
  • Don’t block long or complex passwords 不要限制较长或者复杂的密码
  • Don’t impose unreasonable rules for usernames 不要对用户名强加不合理的规则
  • Allow users to change their username 允许用户修改用户名
  • Let your users delete their accounts 让你的用户删掉他们的账户
  • Make a conscious decision on session length 在对话长度上做出理智的选择
  • Use 2-Step Verification 使用两步身份验证
  • Make user IDs case insensitive 用户 ID 不区分大小写
  • Build a secure auth system 建立一个安全认证系统

基础服务

发表于 2019-12-06   |   分类于 Project Base

服务列表

https://www.twilio.com/
👆SMS
https://netease.im/
👆网易云信 IM
https://sendgrid.com/
👆Transactional Email
https://auth0.com/
👆User Authentication 用户认证
https://www.filestack.com/
👆文件管理,图片、视频,文档
https://mixpanel.com/
👆Data analytics
https://www.algolia.com/
👆搜索
https://zeit.co/now
👆Deployment PaaS
https://www.prisma.io/
👆Prisma ORM

Mac-推荐软件

发表于 2019-12-05   |   分类于 Mac
  • f.lux 专业调节屏幕色温
  • Bartender Dozer 隐藏桌面顶部 icon
  • Magnet 分屏
  • Caffeine 防止自动休眠
  • Muzzle 屏蔽 Mac 的通知
  • HandBrake 视频转码
  • Jitouch 妙控板手势扩展,强烈推荐
  • LastPass 密码管理工具
  • Aerial 视频屏保
  • Bear 笔记
  • Xnip 截图
  • GeekTool 自定义桌面
  • Alfred 搜索软件和文件
  • Contexts 窗口管理工具
  • Octotree github 树形目录插件

移动端适配

发表于 2019-12-04   |   分类于 CSS

超全面的UI设计规范整理汇总(包含iPhone X适配)
APP启动页该如何适配
关于APP适配的经验总结

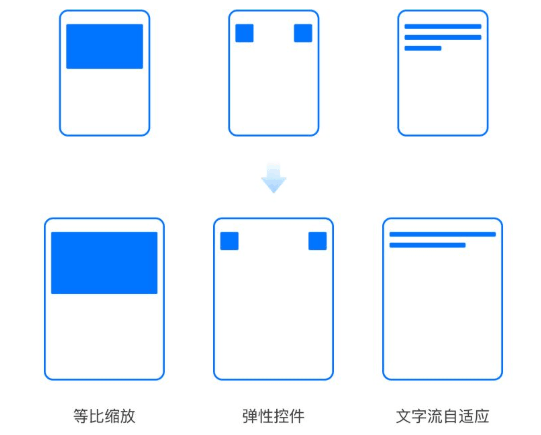
适配只跟倍率相关,同一倍率下,界面上的间距、文字大小、icon大小是一样的,不同的只是屏幕显示内容的宽度和高度不同,元素的间距不同。在适配的时候通常会遵循三个适配原则:等比缩放、弹性控件、文字流自适应。

通用

iOS 严格规定了各个栏的高度,这个是必须遵守的

设备 分辨率 状态栏 导航栏 标签栏 主页指示器
iPhone SE 640×1136px 44px 88px 98px –
iPhone 6s/7/8 750×1334px 44px 88px 98px –
iPhone 6s/7/8 Plus 1242×2208px 66px 132px 147px –
iPhone X (@3x) 1125×2436px 132px 132px 147px 102px
iPhone X (@2x) 750×1624px 88px 88px 98px 68px
  • 垂直方向的间距固定
  • 首焦图等图片需按比例适配
  • 水平方向屏幕两边间距固定,中间元素间距等宽
  • 切片命名的通用规范是,界面功能状态.png
  • 状态栏、导航栏、标签栏是平台的基础控件,需单独处理,不在适配的范围内

移动端单屏页面适配

超出部分裁剪

  • 保持图片比例不变,屏幕高度固定,裁剪左右超出屏幕部分
  • 设置屏幕内图片裁剪比例,裁剪左右超过屏幕部分
  • 底部区域高度固定,图片根据剩余高度适配进行裁剪
  • 屏幕宽度固定,高度根据最大屏幕比来设计,主要信息区域在最小屏幕比里即可,根据不同的屏幕,对图片高度进行裁剪

为不同比例配图

  • App 启动页中有部分启动页通常是一张静态图,例如默认启动页、新手引导图,不常进行更改,为了更好的效果,可以为不同比例的手机屏幕单独配图

使用切图弹性适配

  • 将页面内容分为多个图片,进行布局,提供开发四套切图(@2x、@3x、_xh、_xxh),然后根据屏幕倍率进行弹性适配

图文分离

  • 图片使用等比例放大裁剪,文字需要根据页面位置定位

CSS-单位

发表于 2019-12-04   |   分类于 CSS

响应式布局的常用解决方案对比(媒体查询、百分比、rem和vw/vh)

单位

物理像素:设备屏幕实际拥有的像素点。比如iPhone 6的屏幕在宽度方向有750个像素点,高度方向有1334个像素点,所以iPhone 6总共有750*1334个物理像素。

逻辑像素:也叫“设备独立像素”(Device Independent Pixel, DIP),可以理解为反映在 CSS/JS 代码里的像素点数。每英寸的像素的数量保持在96左右,因此设置为12px的元素,无论使用什么样的设备查看网页,字体的大小始终为1/8英寸。iPhone 6总共有375*667个逻辑像素。

px 绝对尺寸,逻辑像素
pt 全称 point,1/72英寸,用于印刷业,也称“绝对长度”
em 相对尺寸,相对于当前对象内文本的 font-size
rem 相对尺寸,可理解为 “root em”, 其参考对象为根元 <html> 的 font-size
dp = px × (目标设备 dpi 分辨率 / 160)
rpx = px × (目标设备宽 px 值 / 750)

dp 是以屏幕分辨率为基准的动态单位,而 rpx 是以长度为基准的动态单位,两者是不能直接进行互换的。

如果将微信小程序放到平板电脑上运行,屏幕的宽度 px 值有可能会变化(横竖屏、分屏模式等等),这时候,再以宽度为基准,就会出现元素显示不正确的问题,从这一点可以看出,微信团队目前并不希望将小程序扩展到手机以外的设备中。

1px 边框

CSS 中定义的 1px 边框实际有多个物理像素,如果想要一个物理像素显示,使用 transform: scale(0.5) 或 transform: scale(0.33),只剩一个点了。

Chrome-调试

发表于 2019-12-02   |   分类于 Debug

性能调试时使用 command + shift + n 快捷键打开无痕模式,来规避 Chrome 插件对页面性能的影响。

Sinppets

当我们想不起某个方法的具体使用时,会打开控制台随意写一些测试代码,或者想测试一下刚刚写的方法是否会出现期待的样子,但是控制台一打回车本想换行但是却执行刚写的半截代码。这时可以使用 Sources 下面的左侧的 Sinppets 代码片段,点击创建一个新的片段文件,写完测试代码后把鼠标放在新建的文件上右键 Run,再结合控制台查看相关信息。

Performance

确保 Screenshots checkbox 被选中;点击 Capture Settings(⚙️)按钮,DevTools 会展示很多设置,来模拟各种状况,如将 CPU 选为 4x slowdown 模拟4倍低速 CPU,将 Network 选为 Slow 3G 模拟慢速 3G。参考 全新Chrome Devtools Performance使用指南

Memory

查看当前网页的 JavaScript 占用的内存情况。参考 Chrome 开发工具之 Memory

Security

可以告诉你这个网站的安全性,查看有效的证书等。

Application

会列出所有的资源,包括 Manifest、Service Workers、Local Storage、Session Storage、IndexedDB、Web SQL(已被 IndexedDB 干趴下)、Cookies、Cache Storage、Application Cache(已被 Service Workers 干趴下)、BackGround Services、Frames 等,可以对存储的内容编辑和删除。参考 Chrome 开发工具之 Application

Audits

Audits 源于著名的开源自动化分析插件——Lighthouse,Lighthouse 不仅能够分析页面性能,还能够对 PWA、无障碍访问、SEO 等进行测试评分,可选网络环境,运行后给出优化建议。

1…567…17
© 2021 小朱
由 Hexo 强力驱动
主题 - NexT.Pisces