前端学习之路


  • 首页

  • 归档

  • 分类

  • 标签

  • 搜索
close
小朱

小朱

前端学习之路

168 日志
37 分类
37 标签
RSS
GitHub
友情链接
  • 极客学院
  • caniuse
  • codepen
  • JS Bin
  • Babel在线编译
  • Iconfinder图标
  • 在线JSON格式化
  • 智能图像压缩

ES6-Class

发表于 2020-05-22   |   分类于 ES6

Class 的基本语法

ECMAScript 的原生构造函数大致有下面这些:

  • Boolean()
  • Number()
  • String()
  • Array()
  • Date()
  • Function()
  • RegExp()
  • Error()
  • Object()

ES6 的 class 可以看作只是一个语法糖,它的绝大部分功能,ES5 都可以做到,新的 class 写法只是让对象原型的写法更加清晰、更像面向对象编程的语法而已。

1
2
3
4
5
6
7
8
9
10
11
12
13
14
15
16
17
18
19
20
21
22
23
24
25
26
27
28
29
30
31
32
33
34
35
36
37
38
39
40
41
42
43
44
45
46
47
48
49
50
51
52
53
54
55
56
57
58
59
60
61
62
63
64
class Point {
// 实例属性也可以定义在类的最顶层
x = 0;
y = 0;
// 一个类必须有 constructor 方法,如果没有显式定义,一个空的 constructor 方法会被默认添加
constructor(x, y) {
this.x = x;
this.y = y;
}
get prop() {
return 'getter';
}
set prop(value) {
console.log('setter: ' + value);
}
// 类的属性名可以采用表达式
toString() {
return '(' + this.x + ', ' + this.y + ')';
}
}
// 等同于
// Point.prototype = {
// constructor() {},
// toString() {},
// };
// 类必须使用 new 调用
var point = new Point(2, 3);
point.prop = 123; // setter: 123
point.prop; // 'getter'
point.toString(); // (2,3)
// ES6 的类,完全可以看作构造函数的另一种写法
Point === Point.prototype.constructor // true
// 在类的实例上面调用方法,其实就是调用原型上的方法
point.constructor === Point.prototype.constructor // true
// prototype 对象的 constructor 属性,直接指向“类”的本身,与 ES5 是一致的
Point.prototype.constructor === Point // true
// 类的内部所有定义的方法,都是不可枚举的,与 ES5 不一致
Object.keys(Point.prototype) // []
Object.getOwnPropertyNames(Point.prototype)// ["constructor","toString"]
// 实例的属性除非显式定义在其本身(this对象上),否则都是定义在原型上(class上)
point.hasOwnProperty('x') // true
point.hasOwnProperty('y') // true
point.hasOwnProperty('toString') // false
point.__proto__.hasOwnProperty('toString') // true
// 类的所有实例共享一个原型对象
var p1 = new Point(2,3);
var p2 = new Point(3,2);
p1.__proto__ === p2.__proto__ // true
// 存值函数和取值函数是设置在属性的 Descriptor 对象上的
var descriptor = Object.getOwnPropertyDescriptor(
Point.prototype, "prop"
);
"get" in descriptor // true
"set" in descriptor // true

类的所有实例共享一个原型对象,这也意味着,可以通过实例的 __proto__ 属性为“类”添加方法。__proto__ 并不是语言本身的特性,这是各大厂商具体实现时添加的私有属性,虽然目前很多现代浏览器的 JS 引擎中都提供了这个私有属性,但依旧不建议在生产中使用该属性,避免对环境产生依赖。使用实例的 __proto__ 属性改写原型,必须相当谨慎,不推荐使用,因为这会改变“类”的原始定义,影响到所有实例。生产环境中,我们可以使用 Object.getPrototypeOf 方法来获取实例对象的原型,然后再来为原型添加方法/属性。

与函数一样,类也可以使用表达式的形式定义,如下。需要注意的是,这个类的名字是 Me,但是 Me 只在 Class 的内部可用,指代当前类。在 Class 外部,这个类只能用 MyClass 引用。如果类的内部没用到的话,可以省略 Me。

1
2
3
4
5
6
7
8
9
10
11
12
13
14
15
16
17
18
19
20
21
const MyClass = class Me {
getClassName() {
return Me.name;
}
};
let inst = new MyClass();
inst.getClassName() // Me
// 采用 Class 表达式,可以写出立即执行的 Class
let person = new class {
constructor(name) {
this.name = name;
}
sayName() {
console.log(this.name);
}
}('张三');
person.sayName(); // "张三"

注意:

  • 类和模块的内部,默认就是严格模式,考虑到未来所有的代码,其实都是运行在模块之中,所以 ES6 实际上把整个语言升级到了严格模式
  • 类不存在变量提升(hoist),这一点与 ES5 完全不同
  • name 属性总是返回紧跟在 class 关键字后面的类名
  • 如果某个方法之前加上星号(*),就表示该方法是一个 Generator 函数
  • 类的方法内部如果含有 this,它默认指向类的实例。但是,一旦单独使用该方法,很可能报错,可以在构造方法中绑定 this 或者使用箭头函数来解决
1
2
3
4
5
6
7
8
9
10
11
12
13
class Logger {
printName(name = 'there') {
this.print(`Hello ${name}`);
}
print(text) {
console.log(text);
}
}
const logger = new Logger();
const { printName } = logger;
printName(); // TypeError: Cannot read property 'print' of undefined

如果在一个方法前,加上 static 关键字,就表示该方法不会被实例继承,而是直接通过类来调用,这就称为“静态方法”。

1
2
3
4
5
6
7
8
9
10
11
12
13
14
15
16
17
18
19
20
21
22
23
24
25
26
27
28
29
30
31
32
33
34
35
36
37
38
39
40
41
class Foo {
// 提案,静态属性
static myStaticProp = 42;
// 静态方法
static classMethod() {
return 'hello';
}
// 如果静态方法包含this关键字,这个this指的是类,而不是实例,静态方法可以与非静态方法重名
static bar() {
this.baz();
}
static baz() {
console.log('hello');
}
baz() {
console.log('world');
}
}
Foo.classMethod() // 'hello'
var foo = new Foo();
foo.classMethod() // TypeError: foo.classMethod is not a function
Foo.bar() // hello
// 父类的静态方法,可以被子类继承
class Bar extends Foo {
static classMethod() {
// 静态方法也是可以从 super 对象上调用的
return super.classMethod() + ', too';
}
}
Bar.bar() // 'hello'
Bar.classMethod() // "hello, too"
// 静态属性
Foo.prop = 1;
Foo.prop // 1

私有方法和私有属性, ES6 不提供,只能通过变通方法模拟实现。私有属性和私有方法前面,也可以加上 static 关键字,表示这是一个静态的私有属性或私有方法,只能在类的内部调用。

1
2
3
4
5
6
7
8
9
10
11
12
13
14
15
16
17
18
19
20
21
22
23
class IncreasingCounter {
// 在命名上加以区别
_count = 0;
// 提案
#count = 0;
get value() {
console.log('Getting the current value!');
return this.#count;
}
increment() {
this.#count++;
}
}
// 私有属性不限于从 this 引用,只要是在类的内部,实例也可以引用私有属性
class Foo {
#privateValue = 42;
static getPrivateValue(foo) {
return foo.#privateValue;
}
}
Foo.getPrivateValue(new Foo()); // 42

ES6 为 new 命令引入了一个 new.target 属性,该属性一般用在构造函数之中,返回 new 命令作用于的那个构造函数。如果构造函数不是通过 new 命令或 Reflect.construct() 调用的,new.target 会返回 undefined,因此这个属性可以用来确定构造函数是怎么调用的。

1
2
3
4
5
6
7
8
9
10
11
12
13
14
15
16
17
18
19
20
21
22
23
24
25
26
27
28
29
30
function Person(name) {
if (new.target === Person) {
this.name = name;
} else {
throw new Error('必须使用 new 命令生成实例');
}
}
var person = new Person('张三'); // 正确
var notAPerson = Person.call(person, '张三'); // 报错
// Class 内部调用 new.target,返回当前 Class
class Rectangle {
constructor(length, width) {
console.log(new.target === Rectangle);
this.length = length;
this.width = width;
}
}
var obj = new Rectangle(3, 4); // 输出 true
// 子类继承父类时,new.target 会返回子类,利用这个特点,可以写出不能独立使用、必须继承后才能使用的类
class Square extends Rectangle {
constructor(length, width) {
super(length, width);
}
}
var obj = new Square(3); // 输出 false

Class 的继承

Class 可以通过 extends 关键字实现继承,这比 ES5 的通过修改原型链实现继承,要清晰和方便很多。父类的静态方法,也会被子类继承。

1
2
3
4
5
6
7
8
9
10
11
12
13
14
15
16
17
18
19
20
class Point { /* ... */ }
class ColorPoint extends Point {
constructor(x, y, color) {
super(x, y); // 调用父类的 constructor(x, y)
this.color = color;
}
toString() {
return this.color + ' ' + super.toString(); // 调用父类的 toString()
}
}
let cp = new ColorPoint(25, 8, 'green');
cp instanceof ColorPoint // true
cp instanceof Point // true
// Object.getPrototypeOf 方法可以用来从子类上获取父类,可以使用这个方法判断,一个类是否继承了另一个类
Object.getPrototypeOf(ColorPoint) === Point // true

子类必须在 constructor 方法中调用 super 方法,否则新建实例时会报错。这是因为子类自己的 this 对象,必须先通过父类的构造函数完成塑造,得到与父类同样的实例属性和方法,然后再对其进行加工,加上子类自己的实例属性和方法。如果不调用 super 方法,子类就得不到 this 对象。ES5 的继承,实质是先创造子类的实例对象 this,然后再将父类的方法添加到 this 上面 (Parent.apply(this))。ES6 的继承机制完全不同,实质是先将父类实例对象的属性和方法,加到 this 上面(所以必须先调用super 方法),然后再用子类的构造函数修改 this。

如果子类没有定义 constructor 方法,这个方法会被默认添加,代码如下。也就是说,不管有没有显式定义,任何一个子类都有 constructor 方法。

1
2
3
4
5
6
7
8
9
10
class ColorPoint extends Point {
}
// 等同于
class ColorPoint extends Point {
constructor(...args) {
// 只有调用 super 之后,才可以使用 this 关键字
super(...args);
}
}

super 这个关键字,既可以当作函数使用,也可以当作对象使用。在这两种情况下,它的用法完全不同。使用 super 的时候,必须显式指定是作为函数、还是作为对象使用,否则会报错。第一种情况,super 作为函数调用时,代表父类的构造函数,super() 只能用在子类的构造函数之中。ES6 要求,子类的构造函数必须执行一次 super 函数,super 虽然代表了父类的构造函数,但是返回的是子类的实例。

1
2
3
4
5
6
7
8
9
10
11
12
13
14
class A {
constructor() {
console.log(new.target.name);
}
}
class B extends A {
constructor() {
super();
}
}
new A() // A
new B() // B

第二种情况,super 作为对象时,在普通方法中,指向父类的原型对象;在静态方法中,指向父类。ES6 规定,在子类普通方法中通过 super 调用父类的方法时,方法内部的 this 指向当前的子类实例。由于 this 指向子类实例,所以如果通过 super 对某个属性赋值,这时 super 就是 this,赋值的属性会变成子类实例的属性。在子类的静态方法中通过 super 调用父类的方法时,方法内部的 this 指向当前的子类,而不是子类的实例。

1
2
3
4
5
6
7
8
9
10
11
12
13
14
15
16
17
18
19
20
21
22
23
24
25
26
27
28
29
30
31
32
33
34
35
36
37
38
39
40
41
42
43
class A {
constructor() {
this.x = 1;
}
print() {
console.log(this.x);
}
static myMethod(msg) {
console.log('static', msg);
}
myMethod(msg) {
console.log('instance', msg);
}
}
class B extends A {
constructor() {
super();
this.x = 2;
super.x = 3;
console.log(super.x); // undefined
console.log(this.x); // 3
}
m() {
super.print();
}
static myMethod(msg) {
super.myMethod(msg);
}
myMethod(msg) {
super.myMethod(msg);
}
}
let b = new B();
b.m() // 2
B.myMethod(1); // static 1
var b = new B();
b.myMethod(2); // instance 2

大多数浏览器的 ES5 实现之中,每一个对象都有 __proto__ 属性,指向对应的构造函数的 prototype 属性。Class 作为构造函数的语法糖,同时有 prototype 属性和 __proto__ 属性,因此同时存在两条继承链:

  • 子类的 __proto__ 属性,表示构造函数的继承,总是指向父类
  • 子类 prototype 属性的 __proto__ 属性,表示方法的继承,总是指向父类的 prototype 属性

这两条继承链,可以这样理解:作为一个对象,子类(B)的原型(__proto__ 属性)是父类(A);作为一个构造函数,子类(B)的原型对象(prototype 属性)是父类的原型对象(prototype 属性)的实例。

1
2
3
4
5
6
7
8
9
10
11
12
13
14
15
class A {}
class B extends A {}
B.__proto__ === A // true
B.prototype.__proto__ === A.prototype // true
// B 的实例继承 A 的实例
Object.setPrototypeOf(B.prototype, A.prototype);
// 等同于
B.prototype.__proto__ = A.prototype;
// B 继承 A 的静态属性
Object.setPrototypeOf(B, A);
// 等同于
B.__proto__ = A;

extends 关键字后面可以跟多种类型的值,只要是一个有 prototype 属性的函数,就能被继承.由于函数都有 prototype 属性(除了 Function.prototype 函数),因此可以继承任意函数,还可以用来继承原生的构造函数。

1
2
3
4
5
6
7
8
9
10
11
// 子类继承 Object 类,A其实就是构造函数 Object 的复制,A的实例就是 Object 的实例
class A extends Object {}
A.__proto__ === Object // true
A.prototype.__proto__ === Object.prototype // true
// 不存在任何继承,A作为一个基类(即不存在任何继承),就是一个普通函数,所以直接继承 Function.prototype。但是,A调用后返回一个空对象(即Object实例),所以 A.prototype.__proto__ 指向构造函数(Object)的 prototype 属性
class A {}
A.__proto__ === Function.prototype // true
A.prototype.__proto__ === Object.prototype // true

子类实例的 __proto__ 属性的 __proto__ 属性,指向父类实例的 __proto__ 属性。也就是说,子类的原型的原型,是父类的原型。

1
2
3
4
5
var p1 = new Point(2, 3);
var p2 = new ColorPoint(2, 3, 'red');
p2.__proto__ === p1.__proto__ // false
p2.__proto__.__proto__ === p1.__proto__ // true

以前,这些原生构造函数是无法继承的,比如,不能自己定义一个 Array 的子类,因为这个类的行为与 Array 完全不一致,子类无法获得原生构造函数的内部属性,通过 Array.apply() 或者分配给原型对象都不行。原生构造函数会忽略 apply 方法传入的 this,也就是说,原生构造函数的 this 无法绑定,导致拿不到内部属性。ES6 允许继承原生构造函数定义子类,因为 ES6 是先新建父类的实例对象 this,然后再用子类的构造函数修饰 this,使得父类的所有行为都可以继承,这是 ES5 无法做到的。

注意,继承 Object 的子类,有一个行为差异。下面代码中,NewObj 继承了 Object,但是无法通过 super 方法向父类 Object 传参。这是因为 ES6 改变了 Object 构造函数的行为,一旦发现 Object 方法不是通过 new Object() 这种形式调用,ES6 规定 Object 构造函数会忽略参数。

Saber 学习总结

发表于 2020-03-23   |   分类于 Saber

简介

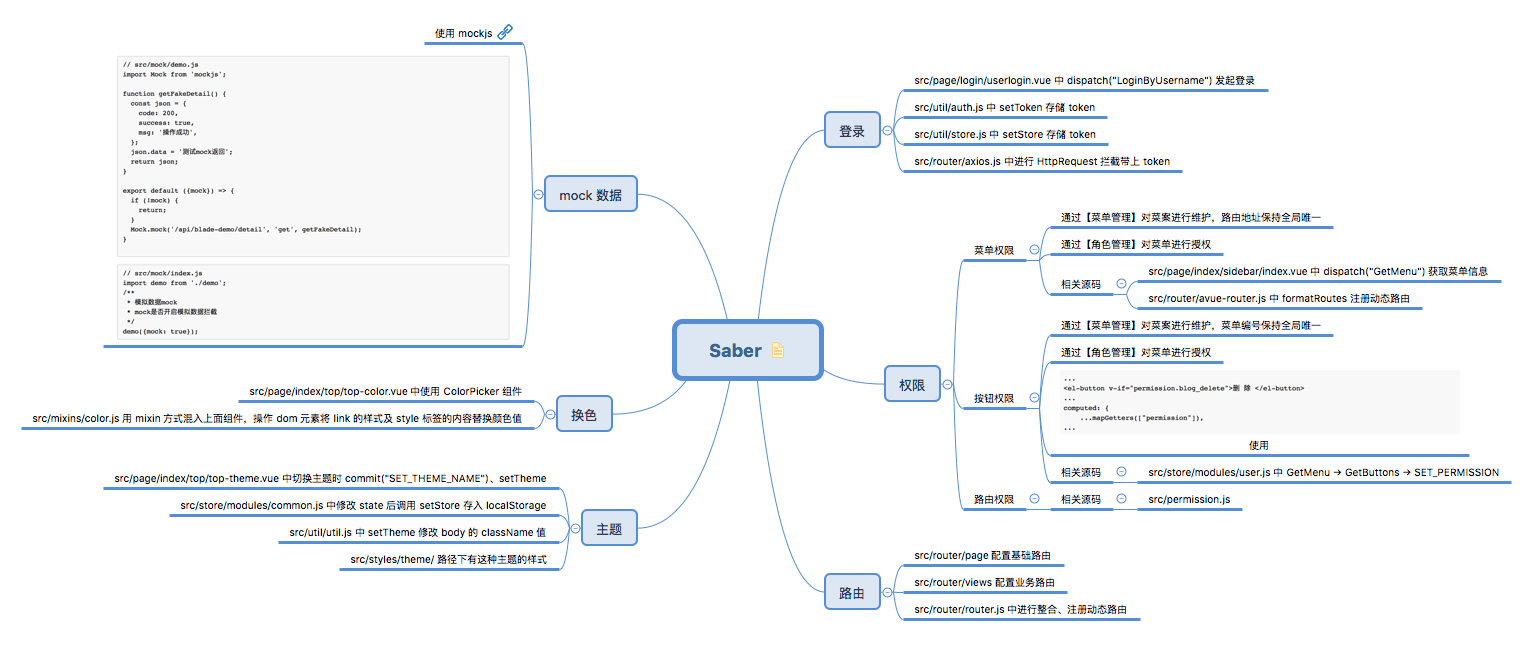
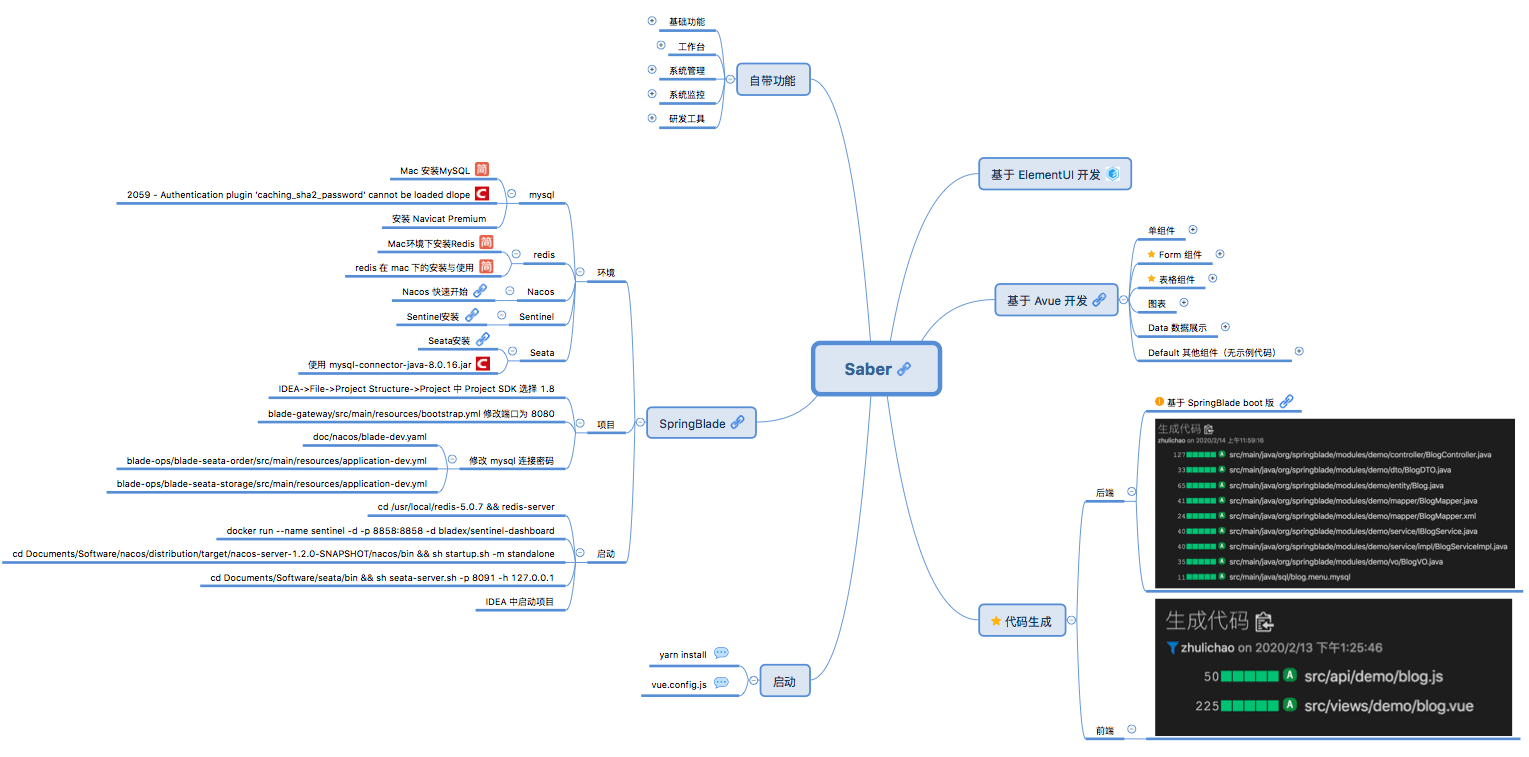
Saber 是 SpringBlade 前端 UI 框架,主要选型技术为 Vue、Vuex、Avue、Element UI,项目基于 Vue CLI 构建。

Saber 在线演示地址

搭建环境

参考 Saber开发手册、Saber 基础 搭建前后端环境,后端项目 SpringBlade 是 SpringCloud 微服务架构,搭建比较复杂,可使用 SpringBlade boot 版,目前测试代码生成的功能只有在 boot 版才能跑通。

Saber 项目地址

SpringBlade 项目地址

SpringBlade boot 项目地址

集成代码校验

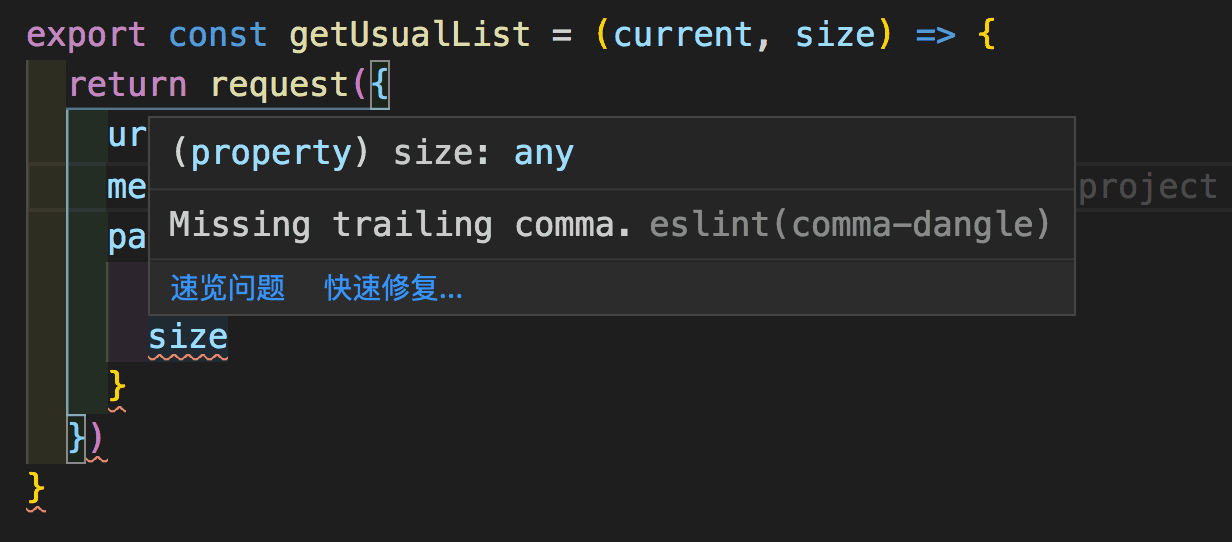
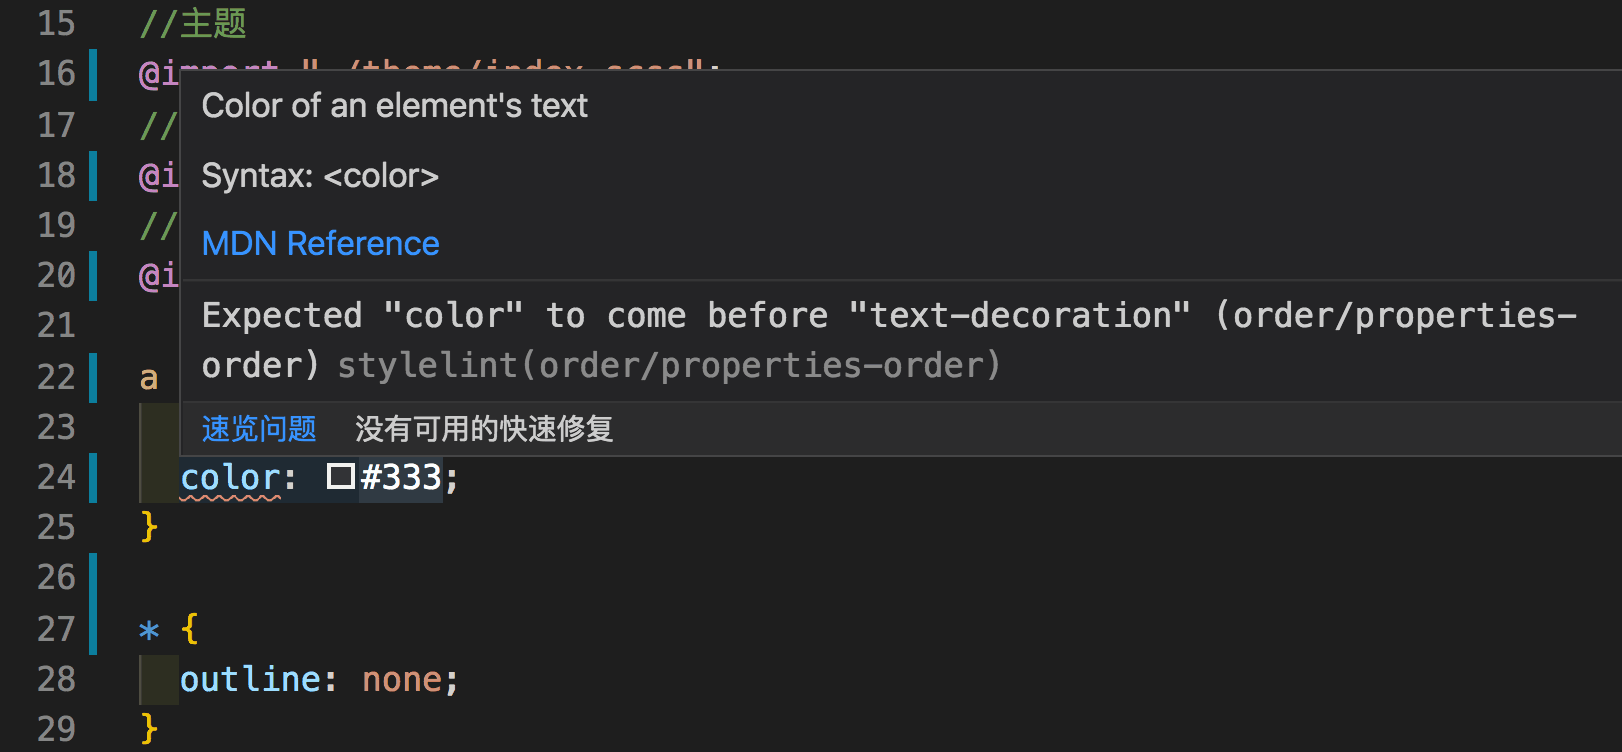
参考 Saber 项目集成代码检查,集成拼写检查、JavaScript 代码检查、CSS 代码检查、代码风格检查以及使用 Git Hook 工具进行提交前代码规范校验。

基础学习

对照 Saber开发手册进行练习,除项目发布外所有练习都可完成。

Avue 官网学习

Avue 是基于现有 Element UI 组件库进行的二次封装,组件库主要针对 table 表格和 form 表单场景,且有在线表单设计器和表格设计器生成代码,还有一些企业常用的组件,是一个更贴近企业级的前端开发组件库,让开发变的更容易。

对照官网进行练习时,可先将 Saber 中 Avue 的版本升级到最新版本后再进行,避免由于版本问题一些 demo 运行报错。

Avue.js 官网地址

Avue表单设计器

Avue表格设计器

Avue-cli 学习

avue-cli 是一款基于 avue 和 element-ui 完全开源、免费的企业后端产品前端集成解决方案,已经准备好了大部分的项目准备工作,可以快速进行二次开发。

avue-cli 在线演示地址

avue-cli 项目地址

avue-cli后台模板框架讲解

源码学习

参考 avue-cli后台模板框架讲解、Saber 源码学习 学习 Saber 源码。

集成 PWA

参考Saber 集成 PWA

Saber 集成 PWA

发表于 2020-03-23   |   分类于 Saber

Saber 是基于 Vue CLI 构建,@vue/cli3.0 的 package 目录下有很多具体的可添加模块,其中就包括 cli-plugin-pwa。具体步骤如下。

添加 pwa 插件

项目根目录下执行 vue add @vue/pwa ,会添加或修改如下文件

打包

npm run build

部署

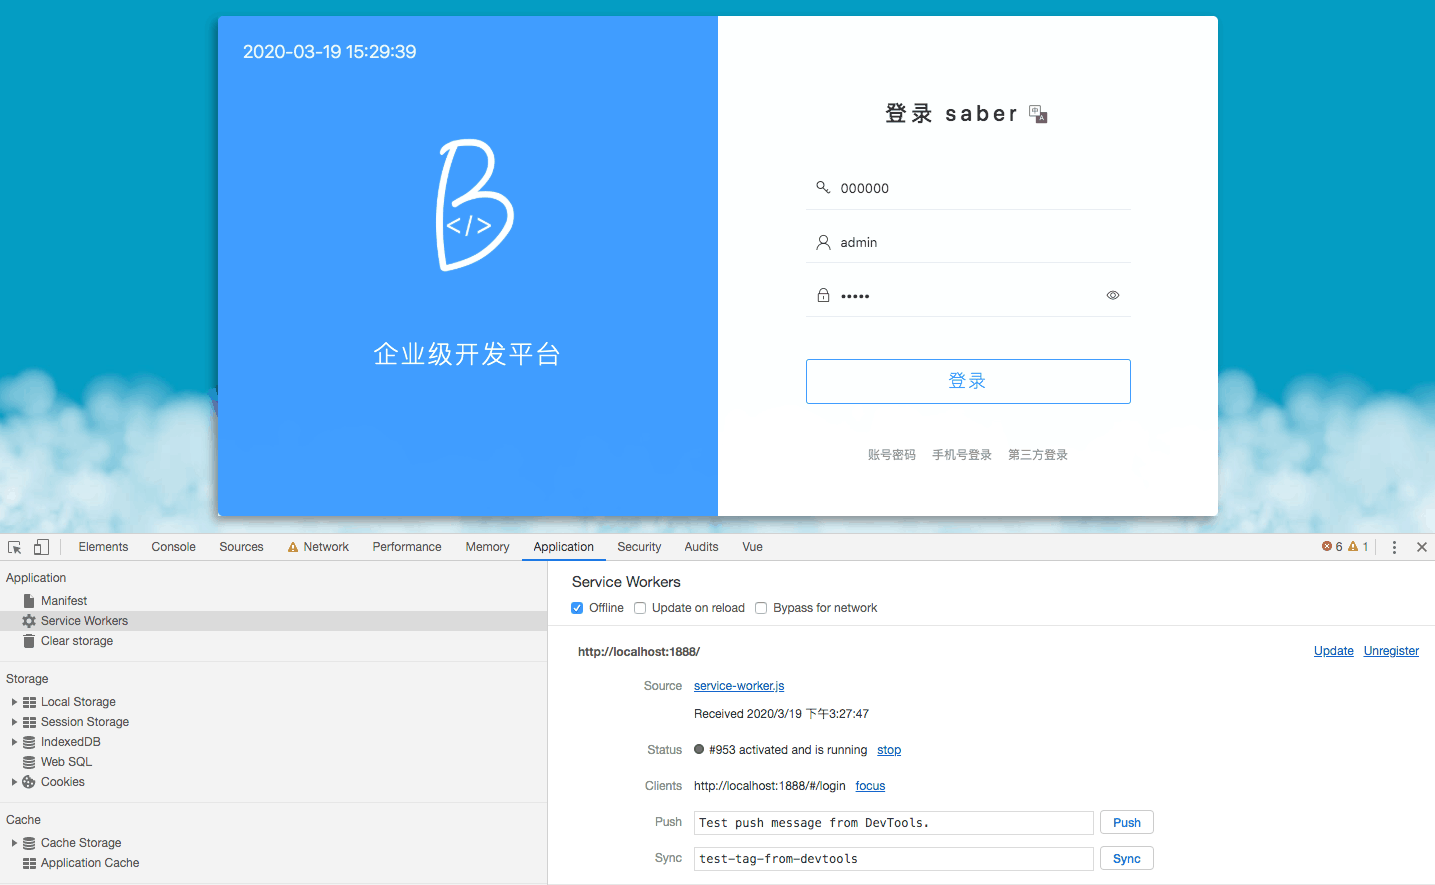
在 dist 目录下执行 python -m SimpleHTTPServer 1888

测试

自定义配置

参考 vue-cli/packages/@vue/cli-plugin-pwa at dev · vuejs/vue-cli · GitHub,通过 vue.config.js 的 pwa 字段进行配置。

vue.config.js 添加如下内容:

1
2
3
4
5
6
7
8
9
10
11
12
13
14
15
pwa: {
name: 'My App',
themeColor: '#4DBA87',
msTileColor: '#000000',
appleMobileWebAppCapable: 'yes',
appleMobileWebAppStatusBarStyle: 'black',
// 配置 workbox 插件
workboxPluginMode: 'InjectManifest',
workboxOptions: {
// InjectManifest 模式下 swSrc 是必填的。
swSrc: 'dev/sw.js',
// ...其它 Workbox 选项...
},
},

dev 目录下添加 sw.js 文件:

1
2
3
4
5
6
7
8
9
10
11
12
13
14
15
16
17
18
19
20
21
22
23
24
25
26
27
self.addEventListener('install', event => {
console.log('Version installing', event);
event.waitUntil(
caches
.open('static-v1')
.then(cache =>
cache.addAll([
'/',
'index.html',
'/cdn',
'/css',
'/img',
'/js',
'/svg',
'/util',
])
)
);
});
self.addEventListener('activate', () => {
console.log('Version now ready to handle');
});
self.addEventListener('fetch', event => {
console.log('fetch', event.request);
});

注意,src/registerServiceWorker.js 文件中修改内容 service-worker.js 为 sw.js。

Saber 源码学习

发表于 2020-03-23   |   分类于 Saber

下载源文件

Saber 项目集成代码检查

发表于 2020-03-23   |   分类于 Saber

开发 Saber 项目使用 VSCode 作为编辑器。Saber 项目使用 @vue/cli 创建的,在此基础上再进行代码检查相关配置,包括拼写检查、JavaScript 代码检查、CSS 代码检查、代码风格检查、使用 Git Hook 工具进行提交前代码规范校验。

拼写检查

  • VSCode 中添加 Code Spell Checker 插件,进行单词的拼写检查,如果代码中出现了拼写错误编辑器会有提示

JS 检查

  • VSCode 中添加 ESLint 插件,参考 ESLint 官网 进行配置,进行 JavaScript 语法和格式检查
  • 项目安装 eslint-plugin-import、eslint-plugin-node、eslint-plugin-promise、eslint-plugin-vue 包
  • 项目根目录添加 .eslintrc.js 文件,内容如下
1
2
3
4
5
6
7
8
9
10
11
12
13
14
15
16
17
18
19
20
21
22
23
24
25
26
27
28
29
30
31
32
33
34
35
36
37
38
39
40
41
42
// .eslintrc.js 文件
module.exports = {
root: true,
env: {
node: true
},
extends: [
'plugin:vue/essential',
'eslint:recommended',
'prettier'
],
plugins: ["import", "prettier"],
rules: {
"prettier/prettier": "error",
'no-console': process.env.NODE_ENV === 'production' ? 'error' : 'off',
'no-debugger': process.env.NODE_ENV === 'production' ? 'error' : 'off',
"no-var": "error",
"indent": ["error", 2, { "SwitchCase": 1 }],
"quotes": [ "error", "single"],
"semi": ["error", "always"],
"comma-dangle": [
"error",
{
"arrays": "ignore",
"objects": "always-multiline",
"imports": "always-multiline",
"exports": "ignore",
"functions": "ignore"
}
],
"no-empty": 2,
"no-eq-null": 2,
"no-new": 0,
"no-fallthrough": 0,
"no-unreachable": 0,
"space-before-function-paren": [2, "never"],
"import/newline-after-import": 2
},
parserOptions: {
parser: 'babel-eslint',
}
}

CSS 检查

  • VSCode 中添加 stylelint 插件,参考 stylelint 进行配置,进行 CSS 语法和格式检查
  • 项目添加 stylelint、stylelint-config-standard、stylelint-config-prettier、stylelint-order 包
  • 项目根目录添加 .stylelintrc.js 文件,内容如下
1
2
3
4
5
6
7
8
9
10
11
12
13
14
15
16
17
18
19
20
21
22
23
24
25
26
27
28
29
30
31
32
33
34
35
36
37
38
39
40
41
42
43
44
45
46
47
48
49
50
51
52
53
54
55
56
57
58
59
60
61
62
63
64
65
66
67
68
69
70
71
72
73
74
75
76
77
78
79
80
81
82
83
84
85
86
87
88
89
90
91
92
93
94
95
96
97
98
99
100
101
102
103
104
105
106
107
108
109
110
111
112
113
114
115
116
117
118
119
120
121
122
123
124
125
126
127
128
129
130
131
132
133
134
135
136
137
138
139
140
141
142
143
144
145
146
147
148
149
150
151
152
153
154
155
156
157
158
159
160
161
162
163
164
165
166
167
168
169
170
171
172
173
174
175
176
177
178
179
180
181
182
183
184
185
186
187
188
189
190
191
// stylelintrc.js 文件
module.exports = {
extends: ['stylelint-config-standard', 'stylelint-config-prettier'],
plugins: ['stylelint-order'],
rules: {
'property-no-unknown': [
true,
{
ignoreProperties: ['composes'],
},
],
'selector-pseudo-class-no-unknown': [
true,
{
ignorePseudoClasses: ['global'],
},
],
'string-quotes': 'single',
'order/order': [
'custom-properties',
'dollar-variables',
'declarations',
'at-rules',
'rules',
],
'order/properties-order': [
'composes',
'position',
'top',
'right',
'bottom',
'left',
'z-index',
'display',
'align-content',
'align-items',
'align-self',
'flex',
'flex-basis',
'flex-direction',
'flex-flow',
'flex-grow',
'flex-shrink',
'flex-wrap',
'justify-content',
'order',
'float',
'width',
'height',
'max-width',
'max-height',
'min-width',
'min-height',
'padding',
'padding-top',
'padding-right',
'padding-bottom',
'padding-left',
'margin',
'margin-top',
'margin-right',
'margin-bottom',
'margin-left',
'margin-collapse',
'margin-top-collapse',
'margin-right-collapse',
'margin-bottom-collapse',
'margin-left-collapse',
'overflow',
'overflow-x',
'overflow-y',
'clip',
'clear',
'font',
'font-family',
'font-size',
'font-smoothing',
'osx-font-smoothing',
'font-style',
'font-weight',
'hyphens',
'src',
'line-height',
'letter-spacing',
'word-spacing',
'color',
'text-align',
'text-decoration',
'text-indent',
'text-overflow',
'text-rendering',
'text-size-adjust',
'text-shadow',
'text-transform',
'word-break',
'word-wrap',
'white-space',
'vertical-align',
'list-style',
'list-style-type',
'list-style-position',
'list-style-image',
'pointer-events',
'cursor',
'background',
'background-attachment',
'background-color',
'background-image',
'background-position',
'background-repeat',
'background-size',
'border',
'border-collapse',
'border-top',
'border-right',
'border-bottom',
'border-left',
'border-color',
'border-image',
'border-top-color',
'border-right-color',
'border-bottom-color',
'border-left-color',
'border-spacing',
'border-style',
'border-top-style',
'border-right-style',
'border-bottom-style',
'border-left-style',
'border-width',
'border-top-width',
'border-right-width',
'border-bottom-width',
'border-left-width',
'border-radius',
'border-top-right-radius',
'border-bottom-right-radius',
'border-bottom-left-radius',
'border-top-left-radius',
'border-radius-topright',
'border-radius-bottomright',
'border-radius-bottomleft',
'border-radius-topleft',
'content',
'quotes',
'outline',
'outline-offset',
'outline-width',
'outline-style',
'outline-color',
'opacity',
'filter',
'visibility',
'size',
'zoom',
'transform',
'box-align',
'box-flex',
'box-orient',
'box-pack',
'box-shadow',
'box-sizing',
'table-layout',
'animation',
'animation-delay',
'animation-duration',
'animation-iteration-count',
'animation-name',
'animation-play-state',
'animation-timing-function',
'animation-fill-mode',
'transition',
'transition-delay',
'transition-duration',
'transition-property',
'transition-timing-function',
'background-clip',
'backface-visibility',
'resize',
'appearance',
'user-select',
'interpolation-mode',
'direction',
'marks',
'page',
'set-link-source',
'unicode-bidi',
'speak',
],
},
};

格式检查

  • VSCode 中添加 Prettier - Code formatter 插件,参考 prettier 官网 进行配置,配置完成可用 Alt + Shift + F 进行代码格式化
  • 项目添加 eslint-config-prettier、eslint-plugin-prettier 包
  • 项目根目录添加 .prettierrc.js 文件,内容如下
1
2
3
4
5
// .prettierrc.js 文件
module.exports = {
"singleQuote": false, // 字符串是否使用单引号,默认为false,使用双引号
"trailingComma": "none", // 是否使用尾逗号,有三个可选值"<none|es5|all>"
}

Git Hook

  • 利用 git 的 hooks 机制,在提交 commit 时自动调用格式校验
  • 项目安装 husky、lint-staged 包
  • package.json 中添加如下内容
1
2
3
4
5
6
7
8
9
10
11
12
13
14
15
16
17
18
19
20
21
22
23
// package.json 文件
{
...
"lint-staged": {
"*.js": [
"vue-cli-service lint",
"git add"
],
"*.{css,less,scss,sss}": [
"stylelint --fix",
"git add"
],
"*.vue": [
"vue-cli-service lint",
"git add"
]
},
"husky": {
"hooks": {
"pre-commit": "lint-staged"
}
}
}

Saber-基础

发表于 2020-03-23   |   分类于 Saber

下载源文件

诺兰模型

发表于 2020-01-07   |   分类于 Other

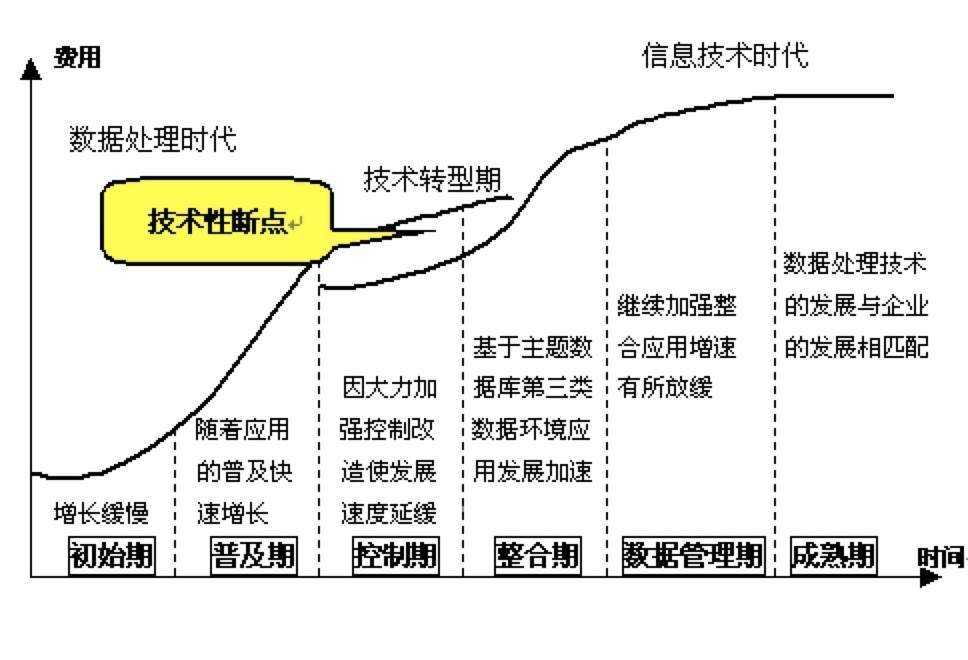
诺兰认为,任何组织由手工信息系统向以计算机为基础的信息系统发展时,都存在着一条客观的发展道路和规律。数据处理的发展涉及到技术的进步、应用的拓展、计划和控制策略的变化以及用户的状况四个方面。1979年,诺兰将计算机信息系统的发展道路划分为六个阶段。诺兰强调,任何组织在实现以计算机为基础的信息系统时都必须从一个阶段发展到下一个阶段,不能实现跳跃式发展。

诺兰模型的六个阶段分别是:初始阶段、传播阶段、控制阶段、集成阶段、数据管理阶段和成熟阶段。

六阶段模型反映了企业计算机应用发展的规律性,前三个阶段具有计算机时代的特征,后三个阶段具有信息时代的特征,其转折点处是进行信息资源规划的时机。”诺兰模型”的预见性,被其后国际上许多企业的计算机应用发展情况所证实。

CSS-网格布局

发表于 2019-12-25   |   分类于 CSS

CSS Grid 网格布局教程

简介

Grid 布局与 Flex 布局有一定的相似性,都可以指定容器内部多个项目的位置。但是,Flex 布局是轴线布局,只能指定”项目”针对轴线的位置,可以看作是一维布局。Grid 布局则是将容器划分成”行”和”列”,产生单元格,然后指定”项目所在”的单元格,可以看作是二维布局。Grid 布局远比 Flex 布局强大。

采用网格布局的区域,称为”容器”(container)。容器内部采用网格定位的子元素,称为”项目”(item)。项目只能是容器的顶层子元素,不包含项目的子元素。Grid 布局只对项目生效。Grid 布局的属性分成两类,一类定义在容器上面,称为容器属性;另一类定义在项目上面,称为项目属性。

容器里面的水平区域称为”行”(row),垂直区域称为”列”(column)。行和列的交叉区域,称为”单元格”(cell)。划分网格的线,称为”网格线”(grid line)。

容器属性

display

display: grid 指定一个容器内部采用网格布局,块级元素
display: inline-grid 指定一个容器内部采用网格布局,行内元素

容器设为网格布局以后,子元素(项目)的 float、display: inline-block、display: table-cell、vertical-align 和 column-* 等设置都将失效。

大小

grid-template-columns 属性设置每一列的列宽
grid-template-rows 属性设置每一行的行高
grid-auto-columns 属性设置浏览器自动创建的多余网格的列宽
grid-auto-rows 属性设置浏览器自动创建的多余网格的行高

有时候,一些项目的指定位置,在现有网格的外部。这时,浏览器会自动生成多余的网格,以便放置项目。如果不指定 grid-auto-columns 和 grid-auto-rows 这两个属性,浏览器完全根据单元格内容的大小,决定新增网格的列宽和行高。

(1) 绝对单位或百分比

1
2
3
4
5
.container {
display: grid;
grid-template-columns: 100px 100px 100px;
grid-template-rows: 33.33% 33.33% 33.33%;
}

(2) repeat()

1
2
3
4
5
.container {
display: grid;
grid-template-columns: repeat(3, 33.33%);
grid-template-rows: repeat(3, 100px 20px 80px);
}

(3) fr

表示比例关系,可以与绝对长度的单位结合使用

1
2
3
4
.container {
display: grid;
grid-template-columns: 100px 1fr 2fr;
}

(4) minmax()

表示长度就在这个范围之中

1
2
3
4
.container {
display: grid;
grid-template-columns: 1fr 1fr minmax(100px, 1fr);
}

(5) auto

表示由浏览器自己决定长度

1
2
3
4
.container {
display: grid;
grid-template-columns: 100px auto 100px;
}

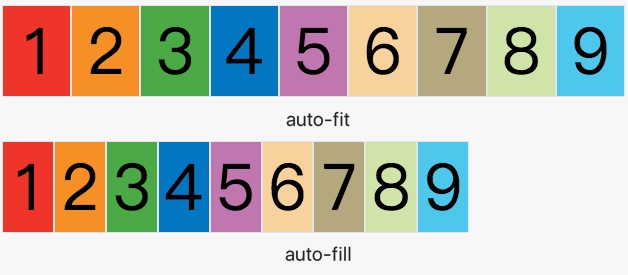
(6) auto-fit

限制单元格的最小宽度,如果容器宽度足够就平均分配剩余空间给每个子元素

1
2
3
4
.container {
display: grid;
grid-template-columns: repeat(auto-fit, minmax(50px, 1fr));
}

(7) auto-fill

限制单元格的最小宽度,如果容器宽度足够保留剩余空间,不进行分配

1
2
3
4
.container {
display: grid;
grid-template-columns: repeat(auto-fill, minmax(50px, 1fr));
}

(8) 网格线名称

使用方括号,指定每一根网格线的名字,同一根线可以有多个名字

1
2
3
4
5
.container {
display: grid;
grid-template-columns: [c1] 100px [c2] 100px [c3] auto [c4 right-line];
grid-template-rows: [r1] 100px [r2] 100px [r3] auto [r4 bottom-line];
}

间距

grid-column-gap 属性设置列间距
grid-row-gap 属性设置行间距
grid-gap: <grid-row-gap> <grid-column-gap> 合并简写形式

1
2
3
4
5
6
.container {
display: grid;
grid-row-gap: 20px;
grid-column-gap: 20px;
grid-gap: 20px;
}

区域

grid-template-areas 指定”区域”(area),一个区域由单个或多个单元格组成,如果某些区域不需要利用,则使用”点”(.),每个区域的起始网格线,会自动命名为 区域名-start,终止网格线自动命名为 区域名-end

1
2
3
4
5
6
7
8
9
10
11
12
13
14
15
16
17
18
19
20
21
22
23
24
25
26
27
28
29
30
31
32
33
34
35
36
37
38
39
40
41
42
43
44
45
46
47
48
49
<style>
.area {
display: grid;
width: calc(5 * 60px);
height: calc(5 * 60px);
background: white;
grid-template-rows: repeat(5, 60px);
grid-template-columns: repeat(5, 60px);
grid-template-areas: ". g g g . " "o_ . . . . " "o . e e . " "o . . . l " ". g_ g_ g_ . ";
}
.g {
grid-area: g;
background: #ea4335;
}
.o_ {
grid-area: o_;
background: #ff9800;
}
.o {
grid-area: o;
background: #fbbc05;
}
.g_ {
grid-area: g_;
background: #34a853;
}
.l {
grid-area: l;
background: #00bcd4;
}
.e {
grid-area: e;
background: #4285f4;
}
.x {
grid-area: x;
background: #9e9e9e;
}
</style>
<div class="area">
<div class="g"></div>
<div class="o_"></div>
<div class="o"></div>
<div class="g_"></div>
<div class="l"></div>
<div class="e"></div>
</div>

顺序

grid-auto-flow 默认值是 row,即”先行后列”,也可以将它设成 column,表示”先列后行”;row dense 表示”先行后列并且尽可能紧密填满”,column dense 表示”先列后行并且尽量填满空格”

容器对齐

justify-content 属性是整个内容区域在容器里面的水平位置(左中右)
align-content 属性是整个内容区域的垂直位置(上中下)
place-content: <align-content> <justify-content> 合并简写形式

1
2
3
4
.container {
justify-content: start | end | center | stretch | space-around | space-between | space-evenly;
align-content: start | end | center | stretch | space-around | space-between | space-evenly;
}

项目对齐

justify-items 属性设置单元格内容的水平位置(左中右)
align-items 属性设置单元格内容的垂直位置(上中下)
place-items: <align-items> <justify-items> 合并简写形式

1
2
3
4
.container {
justify-items: start | end | center | stretch(默认);
align-items: start | end | center | stretch(默认);
}

合并简写

grid-template 属性是 grid-template-columns、grid-template-rows 和 grid-template-areas 的合并简写形式

grid 属性是 grid-template-rows、grid-template-columns、grid-template-areas、grid-auto-rows、grid-auto-columns 和 grid-auto-flow 的合并简写形式

项目属性

位置

grid-column-start 属性设置项目左边框所在的垂直网格线,值为数字或网格线的名字
grid-column-end 属性设置项目右边框所在的垂直网格线,值为数字或网格线的名字
grid-row-start 属性设置项目上边框所在的水平网格线,值为数字或网格线的名字
grid-row-end 属性设置项目下边框所在的水平网格线,值为数字或网格线的名字

上面四个属性的值可以为数字、网格线的名字,也可以使用 span 关键字,表示”跨越”,即左右边框(上下边框)之间跨越多少个网格。使用这四个属性,如果产生了项目的重叠,则使用 z-index 属性指定项目的重叠顺序。

grid-column: <grid-column-start>/<grid-column-end> 属性是 grid-column-start 和 grid-column-end 的合并简写形式
grid-row: <grid-row-start>/<grid-row-end> 属性是 grid-row-start 和 grid-row-end 的合并简写形式
grid-area 属性指定项目放在哪一个区域,值可为区域名称或 <row-start> / <column-start> / <row-end> / <column-end> 的合并简写形式

对齐

justify-self 属性设置单个单元格内容的水平位置(左中右)
align-self 属性设置单个单元格内容的垂直位置(上中下)
place-self: <align-self> <justify-self> 合并简写形式

1
2
3
4
.item {
justify-self: start | end | center | stretch(默认);
align-self: start | end | center | stretch(默认);
}

HTML-特殊标签

发表于 2019-12-24   |   分类于 HTML
1
2
3
4
5
6
7
8
9
10
11
12
13
14
15
16
17
18
19
20
21
22
23
24
25
26
27
28
29
30
31
32
33
34
35
36
37
38
39
40
41
<!DOCTYPE html>
<html lang="en">
<head>
<meta charset="UTF-8">
<title>HTML特殊标签</title>
</head>
<body>
<!-- 带有一定样式,不提倡使用的标签,目前HTML5仍然保留 -->
<b>b加粗</b>
<i>i斜体</i>
<tt>tt打字机字体</tt>
<small>small小一些的字体</small>
<br>
<!-- 带有明确语义的标签 -->
<del>del删除</del>
<ins>ins添加</ins>
<s>s过时废弃</s>
<sup>sup上标</sup>
<sub>sub下标</sub>
<mark>mark特别强调</mark>
<em>em强调</em>
<strong>strong着重</strong>
<dfn>definition定义</dfn>
<code>code代码</code>
<samp>samp例子代码</samp>
<kbd>kbd用户输入</kbd>
<var>variable变量</var>
<cite>cite引用</cite>
<br>
<!-- 英文单词过长时,根据浏览器宽度指定单词换行时机裁切换行 -->
<p>To learn AJAX, you must be familiar with the XMLHttpRequest Object.To learn AJAX, you must be familiar with the XMLHttp<wbr>Request Object.</p>
<!-- 既表达语义又带有一定样式的标签 -->
<address>address地址</address>
<blockquote>blockquote缩进</blockquote>
<q>q小引用</q>
<pre>pre预格式化标签</pre>
<abbr title="中华人民共和国">abbr简写</abbr>
<br>
<bdo dir="rtl">bdo反向</bdo>
</body>
</html>

PWA

发表于 2019-12-11   |   分类于 前端知识

PWA

PWA 就是渐进式 web 应用(Progressive Web App)。早在2016年初,Google 便提出 PWA,希望提供更强大的 web 体验,引导开发者回归开放互联网。它弥补了 web 对比 Native App 急缺的几个能力,比如离线使用、后台加载、添加到主屏和消息推送等,同时它还具备了小程序标榜的“无需安装、用完即走”的特性。目的就是在移动端利用提供的标准化框架,在网页应用中实现和原生应用相近的用户体验的渐进式网页应用。虽然 PWA 技术已经被 W3C 列为标准,但是其落地情况一直以来是很让人失望的,始终受到苹果的阻碍,最重要的原因在于 PWA 绕过 Apple Store 审核,直接推给用户。

如 Vue.js 官网 React 官网

特点

  • 可靠的——即时加载,即使在不确定的网络条件下也不会受到影响
  • 快速的——快速响应用,用平滑的动画和滚动快速响应用户交互
  • 迷人的——感觉就像设备上的原生应用程序,具有沉浸式的用户体验

核心技术

  • Web App Manifest
  • Service Worker
  • Cache API
  • Push & Notification
  • App Shell & App Skeleton
  • Background Sync

Web App Manifest

实现添加至主屏。Web应用程序中,可以通过 manifest.json 控制应用程序的显示方式和启动方式,指定主屏幕图标、启动应用程序时要加载的页面、屏幕方向,甚至可以指定是否显示浏览器 Chrome。Manifest 参考文档

Service Worker

实现离线缓存。由于 JavaScript 是单线程的,随着 web 业务的复杂化,开发者逐渐在 js 中做了许多耗费资源的运算过程,这使得单线程的弊端更加凹显。web worker 正是基于此被创造出来,它是脱离在主线程之外的,我们可以将复杂耗费时间的事情交给 web worker 来做。但是 web worker 作为一个独立的线程,它的功能应当不仅于此。Service Worker 便是在 web worker 的基础上增加了离线缓存的能力。当然在 Service Worker 之前也有在 HTML5 上做离线缓存的 API 叫 AppCache, 但是 AppCache 存在很多缺点。Service Worker 参考文档 GoogleChrome/workbox 库

Service Worker 是由事件驱动的,具有生命周期,可以拦截处理页面的所有网络请求(fetch),可以访问 cache 和 indexDB,支持推送,并且可以让开发者自己控制管理缓存的内容以及版本,为离线弱网环境下的 web 的运行提供了可能,让 web 在体验上更加贴近 native。

基本特征

  • 不能操作页面 DOM,但可以通过事件机制来处理
  • 事件驱动型服务线程
  • 必须使用 HTTPS 和 localhost
  • 运行于浏览器后台,不受页面刷新的影响,可以监听和截拦作用域范围内所有页面的 HTTP 请求
  • 单独的作用域范围,单独的运行环境和执行线程,与主线程独立不会被阻塞
  • 完全异步,无法使用 XHR 和 localStorage
  • 一旦被 install,就永远存在,除非被 uninstall 或者 dev 模式手动删除
1…456…17
© 2021 小朱
由 Hexo 强力驱动
主题 - NexT.Pisces