前端学习之路


  • 首页

  • 归档

  • 分类

  • 标签

  • 搜索
close
小朱

小朱

前端学习之路

168 日志
37 分类
37 标签
RSS
GitHub
友情链接
  • 极客学院
  • caniuse
  • codepen
  • JS Bin
  • Babel在线编译
  • Iconfinder图标
  • 在线JSON格式化
  • 智能图像压缩

css-shapes

发表于 2020-09-26

My Slides

css shape

shape-outside 定义当前元素的形状为非矩形形状,相邻元素中的内容可沿着此元素形状的边缘进行编写

shape-margin 就是沿着 shape-outside 属性生成形状再向外扩展相应的距离,不过扩展后的形状不能超过参考盒模型的区域!

shape-image-threshold 这个属性是专门用来设置图片形状提取时透明通道的阈值,范围为0 ~ 1,默认值为0;阈值为n代表图片中透明通道值大于n的区域都是浮动区域。

css exclusions

致力于解决文本环绕图片的效果,只有微软旗下 IE 和 Edge 可以用

http://www.360doc.com/content/17/0209/17/13092497_627829160.shtml
https://www.html5rocks.com/en/tutorials/regions/adobe/

wrap-flow 设置 exclusion 区域以及内容围绕的方式
wrap-margin 设置 exclusion 区与周边围绕区域的间距
主题切换思路

发表于 2020-08-25   |   分类于 Project Base

js 中动态引入样式文件 import()

不能通过 import() 动态引用样式文件来解决主题切换的问题,因为 import 文件后引入的样式会覆盖先引入的样式,如果选择主题1、主题2,再选择主题1是没办法切换回去的。

:export 实现 CSS、JS变量共享

scss 中导出变量,js 中导入变量。但是 js 中动态改变这个变量的值后无法实现数据双向绑定,dom 不会实时动态渲染。

1
2
3
4
5
$--color-primary: #1890ff;
:export {
theme: $--color-primary;
}
1
2
3
import variables from '@/variables.scss'
console.log(variables.theme);

如果要设置主题颜色,可以将从 css 中导出的变量值注入到 js 的全局变量中,需要设置主题颜色的地方,将样式写在 js 中并使用这个全局变量。

1
2
3
4
5
6
7
8
9
10
11
12
13
14
15
16
17
18
19
20
21
22
23
24
25
<template>
<el-menu
:active-text-color="settings.theme"
>
<router-link
:style="activeStyle(tag)"
>
</template>
<script>
export default {
computed: {
...mapState(["settings"]),
},
methods: {
activeStyle(tag) {
if (!this.isActive(tag)) return {};
return {
"background-color": this.settings.theme,
"border-color": this.settings.theme
};
},
},
}
</script>

js 动态改变 css 的变量

设定 css 可以直接读取的参数,注意变量名前面要加两根连词线,这是 css 的规则。

1
document.getElementsByTagName('body')[0].style.setProperty('--参数名','值');

css 中读取参数

1
$--color-primary: var(--参数名);

js 改变主 html 元素上的类

js 中修改主 html 元素上的类名,css 中不同类名下定义相同的变量,取不同的颜色值,页面元素使用变量。

1
2
// name 为 blue 或 red
document.documentElement.className = 'theme-' + name;
1
2
3
4
5
6
7
8
9
10
11
12
13
14
.theme-blue {
--color: blue;
--background-color: red;
}
.theme-red {
--color: red;
--background-color: blue;
}
.item {
color: var(--color);
background-color: var(--background-color);
}

data-theme 多套主题配色方案

html 根标签设置一个 data-theme 属性,然后通过 js 切换 data-theme 的属性值,SCSS 根据此属性来判断使用对应主题变量。

1
2
3
4
5
6
7
8
9
10
11
12
13
14
15
16
17
18
19
20
21
22
23
24
25
$themes: (
red: (
text-color-primary: #dc2b34,
bg-color-primary: #d91720,
),
blue: (
text-color-primary: #78A4FA,
bg-color-primary: #78A4FA,
),
)
@mixin themeify {
@each $theme-name, $theme-map in $themes {
$theme-map: $theme-map !global;
[data-theme=#{$theme-name}] & {
@content;
}
}
}
@mixin themedColor($key, $name) {
@include themeify {
#{$key}: themed($name) !important;
}
}
1
2
3
4
5
6
@import './mixin';
.testTheme .item {
@include themedColor('color', 'text-color-primary');
@include themedColor('background-color', 'bg-color-primary');
}
1
2
// name 为 blue 或 red
window.document.documentElement.setAttribute('data-theme', name);

若依方案

若依管理系统在线演示地址

思路是下载 element-ui 相应版本的 theme-chalk 样式文件,将其中的主题相关颜色替换成新的颜色值,然后添加到页面的 style 标签上。因为页面中除了 element-ui 还有自己定义的主题样式,再查找一遍所有的 style 标签找到使用主题颜色的标签,替换其中的主题相关颜色值。注意,这种方式只进行了 element-ui 组件基础颜色的切换。

1
2
3
4
5
6
7
8
9
10
11
12
13
14
15
16
17
18
19
20
21
22
23
24
25
26
27
28
29
30
31
32
33
34
35
36
37
38
39
40
41
42
43
44
45
46
47
48
49
50
51
52
53
54
55
56
57
58
59
60
61
62
63
64
65
66
67
68
69
70
71
72
73
74
75
76
77
78
79
80
81
82
83
84
85
86
87
88
89
90
91
92
93
94
95
96
97
98
99
100
101
102
103
104
105
106
107
108
109
110
111
112
113
114
115
116
117
118
119
120
121
122
123
124
125
126
127
128
129
130
131
132
133
134
135
136
137
138
139
140
141
142
143
144
145
146
147
148
149
150
151
152
153
154
155
156
157
158
159
160
161
162
163
164
165
166
167
168
169
170
171
172
173
174
175
176
177
178
179
180
<template>
<el-color-picker
v-model="theme"
:predefine="['#409EFF', '#1890ff', '#304156','#212121','#11a983', '#13c2c2', '#6959CD', '#f5222d', ]"
class="theme-picker"
popper-class="theme-picker-dropdown"
/>
</template>
<script>
const version = require('element-ui/package.json').version // element-ui version from node_modules
const ORIGINAL_THEME = '#409EFF' // default color
export default {
data() {
return {
chalk: '', // content of theme-chalk css
theme: ''
}
},
computed: {
// store 中的 theme 值
defaultTheme() {
return this.$store.state.settings.theme
}
},
watch: {
// 监听 store 中的 theme 值发生变化,修改 theme 值
defaultTheme: {
handler: function(val, oldVal) {
this.theme = val
},
immediate: true
},
// 监听 theme 值发生变化
async theme(val) {
const oldVal = this.chalk ? this.theme : ORIGINAL_THEME
if (typeof val !== 'string') return
const themeCluster = this.getThemeCluster(val.replace('#', ''))
// 此次改变时,上一次的颜色值,用来替换带有主题颜色值的 style 标签
const originalCluster = this.getThemeCluster(oldVal.replace('#', ''))
const $message = this.$message({
message: ' Compiling the theme',
customClass: 'theme-message',
type: 'success',
duration: 0,
iconClass: 'el-icon-loading'
})
const getHandler = (variable, id) => {
return () => {
// 初始化时的主题颜色值,用来修改 element-ui 的 theme-chalk 文件中对应的值,因为每次改变并没有将新的值更新到 this.chalk,所以每次都是用初始值替换新的值
const originalCluster = this.getThemeCluster(ORIGINAL_THEME.replace('#', ''))
const newStyle = this.updateStyle(this[variable], originalCluster, themeCluster)
let styleTag = document.getElementById(id)
if (!styleTag) {
styleTag = document.createElement('style')
styleTag.setAttribute('id', id)
document.head.appendChild(styleTag)
}
styleTag.innerText = newStyle
}
}
// 用 this.chalk 保存下载的 element-ui 的 theme-chalk 样式文件
if (!this.chalk) {
const url = `https://unpkg.com/element-ui@${version}/lib/theme-chalk/index.css`
await this.getCSSString(url, 'chalk')
}
const chalkHandler = getHandler('chalk', 'chalk-style')
// 替换 this.chalk 样式文件中的主题相关颜色值,将新的内容赋给指定的 style 标签
chalkHandler()
// 找到页面中带有旧颜色值的 style 标签,替换其中的主题相关颜色值
const styles = [].slice.call(document.querySelectorAll('style'))
.filter(style => {
const text = style.innerText
return new RegExp(oldVal, 'i').test(text) && !/Chalk Variables/.test(text)
})
styles.forEach(style => {
const { innerText } = style
if (typeof innerText !== 'string') return
style.innerText = this.updateStyle(innerText, originalCluster, themeCluster)
})
this.$emit('change', val)
$message.close()
}
},
methods: {
updateStyle(style, oldCluster, newCluster) {
let newStyle = style
oldCluster.forEach((color, index) => {
newStyle = newStyle.replace(new RegExp(color, 'ig'), newCluster[index])
})
return newStyle
},
getCSSString(url, variable) {
return new Promise(resolve => {
const xhr = new XMLHttpRequest()
xhr.onreadystatechange = () => {
if (xhr.readyState === 4 && xhr.status === 200) {
this[variable] = xhr.responseText.replace(/@font-face{[^}]+}/, '')
resolve()
}
}
xhr.open('GET', url)
xhr.send()
})
},
getThemeCluster(theme) {
const tintColor = (color, tint) => {
let red = parseInt(color.slice(0, 2), 16)
let green = parseInt(color.slice(2, 4), 16)
let blue = parseInt(color.slice(4, 6), 16)
if (tint === 0) { // when primary color is in its rgb space
return [red, green, blue].join(',')
} else {
red += Math.round(tint * (255 - red))
green += Math.round(tint * (255 - green))
blue += Math.round(tint * (255 - blue))
red = red.toString(16)
green = green.toString(16)
blue = blue.toString(16)
return `#${red}${green}${blue}`
}
}
const shadeColor = (color, shade) => {
let red = parseInt(color.slice(0, 2), 16)
let green = parseInt(color.slice(2, 4), 16)
let blue = parseInt(color.slice(4, 6), 16)
red = Math.round((1 - shade) * red)
green = Math.round((1 - shade) * green)
blue = Math.round((1 - shade) * blue)
red = red.toString(16)
green = green.toString(16)
blue = blue.toString(16)
return `#${red}${green}${blue}`
}
const clusters = [theme]
for (let i = 0; i <= 9; i++) {
clusters.push(tintColor(theme, Number((i / 10).toFixed(2))))
}
clusters.push(shadeColor(theme, 0.1))
return clusters
}
}
}
</script>
<style>
.theme-message,
.theme-picker-dropdown {
z-index: 99999 !important;
}
.theme-picker .el-color-picker__trigger {
height: 26px !important;
width: 26px !important;
padding: 2px;
}
.theme-picker-dropdown .el-color-dropdown__link-btn {
display: none;
}
</style>

webpack-theme-color-replacer

参考Ant Design Pro 的 Vue 实现项目的主题切换配置。主要代码涉及如下几个文件:

vue.config.js
src/utils/themeUtil.js
src/store/modules/setting.js
src/App.vue
src/components/setting/Setting.vue

Cookie 共享

发表于 2020-08-24   |   分类于 JavaScript

cookie

  • cookie 针对 IP,不区分端口
  • 顶级域名只能设置 domain 为顶级域名,不能设置为二级域名或者三级域名等等
  • 顶级域名设置的 cookie 可以共享给二级或三级域名,需要显示设置 domain 值

修改 host 文件

  • sudo vi /etc/hosts

Invalid Host Header

更改 localhost 域名为其它域名后,出现了 Invalid Host Header 错误,一通百度过后,发现是 webpack 对于 host 安全性鉴定造成的,解决方案是在 webpack.dev.conf.js 文件中的 devServer 配置对象中添加 disableHostCheck: true 这个属性,修改后就可正常访问了。

使用 iframe 引用 NPM 包

发表于 2020-08-21   |   分类于 NPM

问题描述:想创建一个基于 vue 的业务平台,分为前台和后台,前台写业务相关的代码,后台是依赖若依的管理系统,将后台项目打包后发布到私有 npm 仓库,前台安装这个包直接使用,项目运行起来后是一个整体。这样用户可以下载前台的项目直接运行整个项目,可以修改代码进行个性化定制,但是后台的部分职能只用,不能修改。

依赖若依的后台项目,打包后是一个完整的项目,有自己的 index.html 入口文件,如果想让后台项目打包后与前台项目融合为一体,因为 vue 的入口在前台,前台就需要使用后台项目的所有路由、store,这样的可行性不高,即使可行代价也比较大,所以采用了前台通过 iframe 嵌入后台的入口文件的方式,前台和后台保持相同的登录退出逻辑,能让前台和后台同步登录和退出的状态。

后台项目

  • 基于 RuoYi-Vue/ruoyi-ui 初始化项目
  • src/router/index.js 文件中添加,让前台通过 iframe 嵌入的地址重定向到主页
1
2
3
4
{
path: '/static/cms/index.html',
redirect: 'index',
},
  • src/layout/components/Navbar.vue 文件中修改,让后台点击退出时进入前台页面的主页
1
2
3
4
this.$store.dispatch('LogOut').then(() => {
location.replace('/index');
window.parent.location.replace('/');
});
  • vue.config.js 中修改打包静态资源的路径
1
assetsDir: 'static/cms';

前台项目

  • vue init webpack 初始化项目
  • 移植若依登录、401、404 页面相关代码
  • build/webpack.base.conf.js 文件中添加对 sass 和 svg 的处理
1
2
3
4
5
6
7
8
9
10
11
12
13
14
15
16
17
18
19
20
21
{
test: /\.sass$/,
loader: ['style', 'css', 'sass']
},
{
test: /\.(png|jpe?g|gif|svg)(\?.*)?$/,
loader: 'url-loader',
exclude: [resolve('src/assets/icons')],
options: {
limit: 10000,
name: utils.assetsPath('img/[name].[hash:7].[ext]')
}
},
{
test: /\.svg$/,
loader: 'svg-sprite-loader',
include: [resolve('src/assets/icons')],
options: {
symbolId: 'icon-[name]'
}
},
  • 集成后台项目,因为 iframe 只能访问静态资源,不能直接访问 node_modules 下的资源,因此需要将 node_modules 下打包后的后台项目资源拷贝到前台项目 static 目录下,webpack 添加如下配置
1
2
3
4
5
6
7
8
9
10
11
12
13
new CopyWebpackPlugin([
...
{
from: 'node_modules/后台项目名/index.html',
to: path.join(config.dev.assetsSubDirectory, 'cms'),
ignore: ['.*'],
},
{
from: 'node_modules/后台项目名/static/cms',
to: path.join(config.dev.assetsSubDirectory, 'cms'),
ignore: ['.*'],
},
]);
  • 使用 iframe 引用后台入口
1
2
3
4
5
6
7
8
9
10
11
12
13
14
<template>
<iframe id="cms" class="content" src="/static/cms/index.html"></iframe>
</template>
<style scoped>
.content {
position: absolute;
top: 0;
left: 0;
width: 100vw;
height: 100vh;
border: none;
}
</style>

JSDoc-修改模板

发表于 2020-08-06   |   分类于 JavaScript

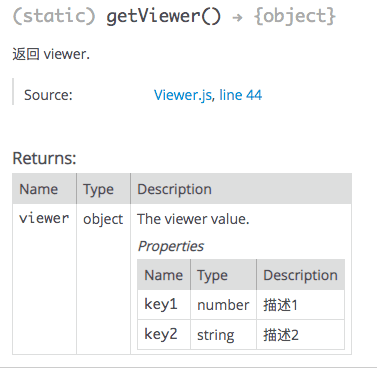
JSDoc 无法修改 Title 名称,显示一直为 Home,无法解析方法返回值的对象结构,可以通过修改模板来解决这些问题。

自定义模板

复制 /node_modules/jsdoc/templates/default 目录到项目目录下,命令中添加 -t path/to/default 即指定了使用项目下的 default 目录作为模板,这时我们就可以修改模板了。

修改 Title 名称

将 default/publish.js 中替换 Home 替换为想要的值即可。

解析方法返回值的对象结构

default/tmpl/method.tmpl 文件中

1
2
3
4
5
6
7
8
9
10
11
12
13
14
15
16
17
18
// 原内容
<?js if (data.returns && returns.length) { ?>
<h5>Returns:</h5>
<?js if (returns.length > 1) { ?><ul><?js
returns.forEach(function(r) { ?>
<li><?js= self.partial('returns.tmpl', r) ?></li>
<?js });
?></ul><?js } else {
returns.forEach(function(r) { ?>
<?js= self.partial('returns.tmpl', r) ?>
<?js });
} } ?>
// 替换为
<?js if (data.returns && returns.length) { ?>
<h5>Returns:</h5>
<?js= this.partial('params.tmpl', returns) ?>
<?js } ?>

default/publish.js 文件中

1
2
3
4
5
// 原内容
returnTypesString = util.format(' &rarr; %s{%s}', attribsString, returnTypes.join('|'));
// 替换为
returnTypesString = util.format(' &rarr; %s{%s}', attribsString, returnTypes[0]);

添加自定义插件如下

1
2
3
4
5
6
7
8
9
10
11
12
13
14
15
16
17
18
exports.handlers = {
newDoclet: e => {
// 修改对 return 的解析
if (e.doclet.returns) {
e.doclet.returns.forEach(item => {
if (item.description) {
const parseArr = item.description.split(' - ');
if (parseArr.length > 1) {
item.description = parseArr[1];
item.name = parseArr[0];
} else {
item.description = parseArr[0];
}
}
});
}
},
};

效果为

1
2
3
4
5
6
7
8
9
/**
* 返回 viewer.
* @return {object} viewer - The viewer value.
* @return {number} viewer.key1 - 描述1
* @return {string} viewer.key2 - 描述2
*/
static getViewer() {
return this.viewer;
}

类名称显示模块路径

default/publish.js 文件中,将 buildMemberNav 方法替换为如下内容

1
2
3
4
5
6
7
8
9
10
11
12
13
14
15
16
17
18
19
20
21
22
23
24
25
26
27
28
29
30
31
32
33
34
35
36
37
38
39
40
41
// 替换为
function buildMemberNav(items, itemHeading, itemsSeen, linktoFn) {
let nav = '';
if (items.length) {
let itemsNav = '';
let pathName = '';
items.forEach(item => {
const result = item.comment.match(/@path \{[^\}]+\}/);
if (result && result[0]) {
pathName = result[0].replace('@path {', '').replace('}', '');
}
let displayName;
if (!hasOwnProp.call(item, 'longname')) {
itemsNav += `<li>${linktoFn('', item.name)}</li>`;
} else if (!hasOwnProp.call(itemsSeen, item.longname)) {
if (env.conf.templates.default.useLongnameInNav) {
displayName = item.longname;
} else if (pathName) {
displayName = pathName;
} else {
displayName = item.name;
}
itemsNav += `<li>${linktoFn(
item.longname,
displayName.replace(/\b(module|event):/g, '')
)}</li>`;
itemsSeen[item.longname] = true;
}
});
if (itemsNav !== '') {
nav += `<h3>${itemHeading}</h3><ul>${itemsNav}</ul>`;
}
}
return nav;
}

效果为

1
2
3
4
5
6
/**
* 通过火星科技创建地球
* @hideconstructor
* @path {EVECesium.App.Viewer}
*/
class Viewer {}

API-设计

发表于 2020-08-06   |   分类于 JavaScript

js 类库升级兼容,暴露出来的东西,尽量不要变

  • 模块名、类名、方法名,保持不变
  • 已有参数尽量不变,如果发生变化可以在代码中做非空判断、类型转换、判断 version 等方式来兼容老版本
  • 新增参数非必填,可以提供默认值
  • 返回值预留出扩展空间
  • 多做一些非空判断,报错信息
  • 不到万不得已,不要写新的方法替代老的方法

类库编写规范

  • 注释清晰,与代码一致
  • 函数顶部,先进行参数校验、格式转换
  • 所有方法都写上 @since,表示从哪个版本支持的

constructor 中异步操作

constructor 的作用是返回一个对像实例,如果加了 async 就变成返回一个 promise 了,所以这个方法行不通,因为做不到既返回一个 promise 又返回一个 object 实例。

如果一定要进行异步操作,可以考虑使用静态方法,在异步操作结束后返回一个自定义的对象。但是因为这个静态方法是异步的,在调用处还要考虑对异步操作的处理。

这种操作可以参考 React 的官方文档,建议请求接口数据不要放在 constructor 中,而是放在 componentDidMount 中。

区别类方法和静态方法

对于变量,只要数据在对象中都是不同的,就是对象中的特有数据,必须存储在对象中,是非静态的;如果是相同的数据,对象不需要做修改,只需要用即可,不需要存储在对象中,定义成静态的。

函数是否用静态的就参考一点,就是该函数的功能能否访问到对象的特有数据。简单点说从源码看该功能是否要访问非静态的成员变量,如果需要,该功能是非静态的,如果不需就可以定义成静态函数。

Webpack-error

发表于 2020-08-05   |   分类于 Webpack

ERROR Failed to compile with 2 errors

npm run dev 报 ERROR Failed to compile with 2 errors,没有详细的报错信息,出现这种情况可能是引入的文件路径不对导致的,如 HTML 模板路径,有几个 error 说明有几处路径不对。

webpack-entry-html

发表于 2020-07-29   |   分类于 Webpack

项目中有多个 js 入口,要将编译生成的 js 分别插入到不同的 html 页面中。

1
2
3
4
5
6
7
8
9
10
11
12
13
14
15
16
17
18
entry: {
app: './app/main.js',
source: './source/index.js'
},
plugins: [
new HtmlWebpackPlugin({
filename: 'index.html',
template: 'index.html',
inject: true,
chunks: ['manifest', 'vendor', 'app'],
}),
new HtmlWebpackPlugin({
filename: 'demo.html',
template: 'demo.html',
inject: false,
chunks: ['manifest', 'vendor', 'source'],
}),
],

demo.html 中指定插入位置

1
2
3
4
5
6
7
8
9
10
11
12
13
14
15
16
17
18
19
20
21
<!DOCTYPE html>
<html>
<head>
<meta charset="utf-8" />
<meta name="viewport" content="width=device-width,initial-scale=1.0" />
<title>demo</title>
<% for (var css in htmlWebpackPlugin.files.css) { %>
<link href="<%=htmlWebpackPlugin.files.css[css] %>" rel="stylesheet" />
<% } %>
</head>
<body>
<div id="app"></div>
<% for (var chunk in htmlWebpackPlugin.files.chunks) { %>
<script type="text/javascript" src="<%=htmlWebpackPlugin.files.chunks[chunk].entry %>"></script>
<% } %>
<script type="text/javascript" src="./static/app/utils.js"></script>
<script>
// other js
</script>
</body>
</html>

Commander.js-demo

发表于 2020-07-24   |   分类于 Project Base
1
2
3
4
5
6
7
8
9
10
11
12
13
14
15
16
17
18
19
20
21
22
23
24
25
26
27
28
29
30
31
32
33
34
35
36
37
38
39
40
41
42
43
44
45
46
47
48
49
50
51
52
53
54
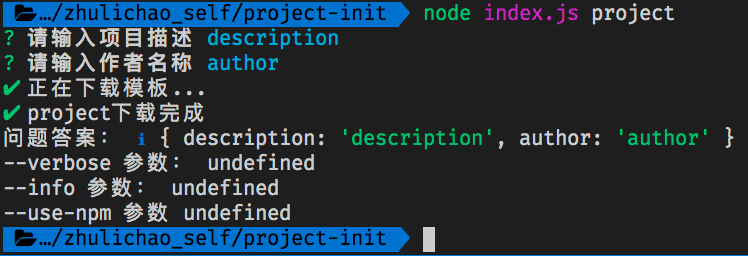
#!/usr/bin/env node
const commander = require('commander');
const inquirer = require('inquirer');
const ora = require('ora');
const chalk = require('chalk');
const symbols = require('log-symbols');
const packageJson = require('./package.json');
const spinner = ora('正在下载模板...');
// 命令
const program = new commander.Command(packageJson.name)
.version(packageJson.version)
.arguments('<name>')
.action((name) => {
// 问题
inquirer
.prompt([
{
type: 'input',
name: 'description',
message: '请输入项目描述',
},
{
type: 'input',
name: 'author',
message: '请输入作者名称',
},
])
.then((answers) => {
// 显示下载中
spinner.start();
setTimeout(() => {
spinner.succeed();
console.log(symbols.success, name + '下载完成');
console.log('问题答案:', symbols.info, answers);
console.log('--verbose 参数:', program.verbose);
console.log('--info 参数:', program.info);
console.log('--use-npm 参数', program.useNpm);
}, 5000);
});
})
.option('--verbose', 'print additional logs')
.option('--info', 'print environment debug info')
.option('--use-npm')
.allowUnknownOption()
.usage(`${chalk.green('<name>')} [options]`)
.on('--help', () => {
console.log(
` If you have any problems, do not hesitate to file an issue.`
);
})
.parse(process.argv);

CommonJS-ES6

发表于 2020-07-23   |   分类于 JavaScript

CommonJS

CommonJS 规范的出发点:后台 JS 没有模块系统、标准库较少、缺乏包管理工具;为了让 JS 可以在任何地方运行,以达到 Java、C#、PHP 这些后台语言具备开发大型应用的能力。

CommonJS 是服务端模块的规范你,由 nodejs 推广使用。每一个文件就是一个模块,拥有自己独立的作用域、变量、以及方法等,对其它的模块都不可见。CommonJS 规范规定,每个模块内部,module 变量代表当前模块这个变量是一个对象,它的 exports 属性(即module.exports)是对外的接口。加载某个模块,其实是加载该模块的 module.exports 属性,require 方法用于加载模块。

CommonJS 规范加载模块是同步的,输入的是变量的拷贝,也就是说,一旦输出一个值,模块内部的变化就影响不到这个值了。

1
2
3
4
5
6
7
8
9
10
11
12
// test1.js
var x = 5;
var addX = function (value) {
return value + x;
};
module.exports.x = x;
module.exports.addX = addX;
// test2.js
var app =require('./test1.js');
console.log(app.addX(app.x)); // 10

ES6

历史上,JavaScript 一直没有模块(module)体系,无法将一个大程序拆分成互相依赖的小文件,再用简单的方法拼装起来。其他语言都有这项功能,比如 Ruby 的 require、Python 的 import,甚至就连 CSS 都有 @import,但是 JavaScript 任何这方面的支持都没有,这对开发大型的、复杂的项目形成了巨大障碍。

在 ES6 之前,社区制定了一些模块加载方案,最主要的有 CommonJS 和 AMD 两种。前者用于服务器,后者用于浏览器。ES6 在语言标准的层面上,实现了模块功能,而且实现得相当简单,完全可以取代 CommonJS 和 AMD 规范,成为浏览器和服务器通用的模块解决方案。

ES6 模块的设计思想是尽量的静态化,使得编译时就能确定模块的依赖关系,以及输入和输出的变量。CommonJS 和 AMD 模块,都只能在运行时确定这些东西。ES6 模块输入的是只读的变量的绑定,因为它的本质是输入接口。

1
2
3
4
5
6
7
8
9
// test1.js
export var x = 5;
export function addX(value) {
return value + x;
}
// test2.js
import { x, addX } from './test1.js';
console.log(addX(x)); // 10
1234…17
© 2021 小朱
由 Hexo 强力驱动
主题 - NexT.Pisces